I made a piece for my friend Sarah to give to her mother-in-law for Mother's Day. I had little to go on except she scrapbooks and loves anything Gold and White. I ended up making a 12x12 piece which she can punch holes in and use for an album cover or she can simply frame it.
To start, I grabbed everything GOLD that I owned….which turned out to be quite a lot….
I grabbed gold Inks, paints, papers, powders, and glitters….
Then I made some embellishments….
including rosettes, a gilded bird (which I didn't use), and punched butterflies and hydrangea petals.
The butterflies are made using a Martha Stewart punch on paper that I overlaid with composite leaf flakes in a range of colors from copper to light gold. I glued the butterflies only in the center to give them texture and movement.
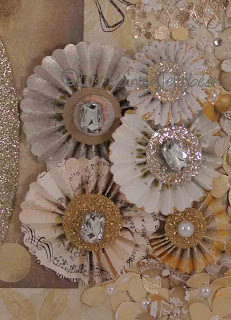
The rosettes are made with Tim Holtz Sizzix die Paper Rosette. I use several different papers- a pearl, a gold, and a distressed patterned paper. I always use Washi Tape on the rosettes as suggested by Tim, but rather than use it on the back like he does, I use it on the front as part of the decoration. I punched circles for the front (as opposed to the one that comes with the die- that one I use on the back along with hot glue to hold the rosette together). I blinged the circles with glass glitter in several colors and I painted most of the rosettes themselves-after they are put together- with Twinkling H2O's in a gold color. Finally I added big Jolée rhinestones.
The background of the entire 12x12 piece began with 2 pieces of lightweight chipboard that I laminated using 1-inch Red-Line Tape. The paper I used was made by me. I started with a piece of white Bazzille cardstock which I inked using Distress Ink then masked, stamped, flicked water and stamped some more. I am pretty happy with how it came out. I added a 3-inch piece of the Mistable paper on the left-hand border.
This is the finished project. I will let her decide whether to punch holes or frame the piece.
I hope she likes it!
I linked this up with the following Linky Parties:
Adventures of a DIY Mom
The Trendy Treehouse
Tutus and Tea Parties
Laters Baby….
To start, I grabbed everything GOLD that I owned….which turned out to be quite a lot….
I grabbed gold Inks, paints, papers, powders, and glitters….
Then I made some embellishments….
including rosettes, a gilded bird (which I didn't use), and punched butterflies and hydrangea petals.
The butterflies are made using a Martha Stewart punch on paper that I overlaid with composite leaf flakes in a range of colors from copper to light gold. I glued the butterflies only in the center to give them texture and movement.
The rosettes are made with Tim Holtz Sizzix die Paper Rosette. I use several different papers- a pearl, a gold, and a distressed patterned paper. I always use Washi Tape on the rosettes as suggested by Tim, but rather than use it on the back like he does, I use it on the front as part of the decoration. I punched circles for the front (as opposed to the one that comes with the die- that one I use on the back along with hot glue to hold the rosette together). I blinged the circles with glass glitter in several colors and I painted most of the rosettes themselves-after they are put together- with Twinkling H2O's in a gold color. Finally I added big Jolée rhinestones.
The hydrangea petals are punched with more Martha punches. This time I used white card stock gilded with sheets of imitation gold leaf. The sheets give it a smooth finish. I also punched petals from a piece of Heidi Swapp's Mistable's paper that I had colored with Distress Inks. Originally, I used only the gold petals but it was OVERWHELMING to say the least and needed the variation of the more subdued paper. Each gold petal received a pearl center while each Mistable petal received a pretty pale, pale pink flat-back rhinestone.
I used a Grunge Paper "b" glittered with Martha Stewart Gold Glitter. The recipient's last name begins with "b". The paper behind the "b" started as white paper which I inked, stamped with a filagree background stamp using Perfect Pearl Medium and brushd with Perfect Pearl. The polka dots are more of the gold-leafed cardstock punched with a circle punch and scattered on the paper. The background of the entire 12x12 piece began with 2 pieces of lightweight chipboard that I laminated using 1-inch Red-Line Tape. The paper I used was made by me. I started with a piece of white Bazzille cardstock which I inked using Distress Ink then masked, stamped, flicked water and stamped some more. I am pretty happy with how it came out. I added a 3-inch piece of the Mistable paper on the left-hand border.
This is the finished project. I will let her decide whether to punch holes or frame the piece.
I hope she likes it!
I linked this up with the following Linky Parties:
Adventures of a DIY Mom
The Trendy Treehouse
Tutus and Tea Parties
Laters Baby….


So beautiful. I know anyone would love it! K
ReplyDeleteBeautiful! Love the gold butterflies and flowers.
ReplyDeleteA very beautiful project.
ReplyDeletevery very pretty and elegant
ReplyDeleteI can't get over how pretty that is! Will you make me one;) Thanks for sharing at Terrific Tuesdays!
ReplyDeleteRachel
adventuresofadiymom.blogspot.com
That's really beautiful! Thanks so much for sharing at our Pinteresting Party!
ReplyDelete