Saturday, December 21, 2013

Christmas Decor

Still not feeling terrific means I didn't do much decorating but what I did looks really pretty.  I stuck with only the mantel and the tree but they are gorgeous and look so warm and inviting this holiday. 
I made the "Joyeux Noel" several years ago using purchased chipboard letters and glitter strung on a silver tinsel twine.  I added the icicle lights and some pretty globe mercury glass light balls and candleholders.  The candles are glittered candles from Pottery Barn and they are a NIGHTMARE.  They are real candles with a plastic sleeve that was supposed to be covered in a thick chunky glitter.  They were gorgeous when they were in the box.  But as soon as I got them out I realized that more than half of them had cracks that lead to all the glitter falling off.  Ugh...too expensive for that to happen!  

 My mantel is a mix of gold, silver and glitter.  Glitter isn't a color? Hmmm. Okay so maybe gold, silver and some high quality frosted greens that I bought several years ago and keep repurposing for holiday decor. 
 I love the vintage christmas balls and this simple Apothacary Jar full of silver and teal balls is gorgeous among the white lights and glitter.
 The pinecones are part of the greenery that I bought from a decorating store several years ago.  The glittered-stars and wreathes are cheap Target ornaments that have a ton of sparkle and look yummy.
The velvet and glittered flowers are poinsettias that I simple placed among the greenery.  
The huge chalkboard art is from The Caravan Shoppe.  It comes as a digital file and for $6 I had it printed-per the included instructions- at FedEx Office.  It is hung using a dowel and a tinsel garland.  
The pictures were edited on Rhonna Farrer's App available in the App shop. Her App was named one of the best Apps of the year.  You can read more about it here.
Happy Holidays!

Thursday, December 19, 2013

Goodbye to a Beautiful Friend


This has been a tough month to say the least.  Let me start by saying that the 5-day power outage was just the beginning.  From there we moved on to a busted waterline (the line to the ice maker) that flooded the basement.  Thankfully, most of the stuff that was in the flood zone was in plastic containers so I didn't lose a lot...but the walls, carpet and ceiling in the furnace room, my studio and a guest bedroom (that now sports a relaxing waterbed) got WET.  Modernistic came to dry out everything which made my job pretty easy; they even moved stuff and boxed up some things for me.  They ran fans, heaters, and dehumidifiers for a week which almost doubled our electric bill- ironic after the power outage...am I right?
The worst thing to happen however, was much, MUCH worse.  My 15yo, Ryann, is part of a very close freshman class at her high school.  Two weeks ago one of the most popular boys, and a very good friend of Ryann's, committed suicide after a long history of severe headaches.  It left Ryann a devastated wreck.  I felt a lot of guilt;  I KNOW all about chronic headaches and I know I could have given him hope that "it get's better". It is so hard to keep that in focus when chronic pain takes away fun, steals your life and sucks out your soul.  I may have even been able to offer some help with a finding a diagnosis as my path to an accurate diagnosis was long and hard.  It left me with both PTSD and a lot of knowledge about atypical headaches.  I learned that 1. It is hard to hang on to hope when nobody is willing to help and 2. That doctors really don't know a lot about headache pain that doesn't fit their specific model for migraine and/or tension headache.  Instead of looking for other causes, they stuff you into their model... come hell or high water.  There is a lot of misunderstanding even among doctors who call themselves headache experts.  One of my worst experiences was with the Diamond Headache Clinic in Chicago.  
But back to Jake.  I know, I KNOW, I could have helped him...but we just didn't know.  He never told his friends exactly how BAD it was.  So, I feel regret and remorse over something I had no control over ...but that is so damn horrifically sad, that it brings me to tears.  Then there was the funeral.  An experience I will never forget.  From the woman who switched seats with me (it was a full house and I had to sit one seat in front of Ryann).  Ryann started crying before the service started and as I turned to say "are you ok?" the woman said "I will switch with you".  I was so grateful.  

Being a former pediatric oncology nurse means I have been to my fair share of kids' funerals.  But this funeral was...a lot.  It was  both devastating and heartwarming.  I watched a tremendous number of freshman boys openly grieving together;  hugging and holding each other...crying so much.  The support they gave each other took my breath away.  So many tears were shed that day.  Many friends and classmates-14-and-15year olds- got up and spoke to a standing-room crowd.  They spoke about their friend Jake.  It was beautiful and so so sad.  His family spoke- his mom and 3older siblings- poured their hearts out giving Jake beautiful, devastating eulogies.  So much regret and guilt. 

Today would have been his 15th birthday and it hard not to wish there was something I could do to help his mom...his sister who is having an especially hard time.  But I can't do anything but remember the bright boy with so much potential who was a great friend to so many. 

We will remember those we love and cherish this holiday.  Tomorrow is Ryann's birthday...where have the years gone?  She is becoming a beautiful young woman and while I want to stop time and keep her my baby, I am also excited to see where her life takes her.  Tomorrow is the big 15.

I intended to post my pics of my holiday decor but after writing about Jake, it wasn't appropriate.  So, I will make that post tomorrow.

Sunday, December 8, 2013

Paper Spindle Christmas Ornaments

Perviously I showed you the snowflake ornament I made suing a file from SVGCuts.com.  Today I have two new ornaments I made using the same Christmas Ornament file.
I love being able to choose colors and patterns for each ornament.  Embellishing can be nothing more than patterned paper all the way to something over-the-top elaborate.
Coredinations 12x12 Tim Holtz Distressed Cardstock Sheets
This ornament looks a lot more difficult than it really is.  The base is cut in two pieces so they fit on a 12x12 sheet of paper.  The two pieces are glued together by connecting the tab of the second piece to the first piece.  Then the entire piece is folded and the various tabs are glued into place.  The base was cut from Tim Holtz & Ranger Core'dination Distress Collection in Fired Brick.  The panels are cut from an old Basic Grey patterned paper.  The design calls for triangle shaped panels along the bottom of the ornament  but I decided to glitter the entire bottom portion with Fired Brick Distress Glitter.

I added silver tinsel yarn- this actually serves a structural function rather than a purely decorative one as it pulls the ornament into shape.  I finished it off with silver threat for hanging and red rhinestones.

I made another version with similar papers and glitter but added creme pearls and gold yard.  

Saturday, November 30, 2013

Christmas Ornament #1: Snowflake

Let the Merriment begin.  It's Christmas.  Already.  Seriusly, it is?  Where did 2013 go?  No, seriously, where?  This year flew by...faster than EVER ever.  I hate getting old.
  It's time to commence the Christmas projects. This sweet snowflake ornament was made using my Cricut Expression and a digital cutting file from SVGCuts called Christmas Ornament Kit.  

Reconditioned Cricut Expression® + Extreme Fonts SetSVGCuts sells digital cutting files that use the .svg format.  .SVG can be cut using a variety of electronic cutting machines...except the Cricut.  Why no Cricut? Well, because the company that makes it, Provo Craft, decided to follow in the foot steps of the music industry.  You see, the music companies   stuck hard to the CD as the only viable music format and outright rejected digital music as a viable format.  And they refused to give that up even when it was apparent that their customer's wanted to go to a digital format.  Instead of meeting their customer's needs they went after digital music users-often poor, clueless college students and attacked the biggest digital music website, Napster, shutting it down.  For years they continued to ignore what their customers' wanted until iTunes kicked their butts.

The Cricut  was originally designed to be used with a cartridge that, while full of a hundred or so images, was also quite expensive at about $80 each.  Who wants to pay almost $100 to get the 1 or 2
Carina Gardner "Frame 5" for $0.75
images that looked great and the 60 images that sucked?  Today the cartridges sell for about $20-40 and are often on sale;  but that is still quite a bit of moola if you only want a few images.

Enter Capitalism... a company called Craft Edge developed an aftermarket product called Sure Cuts A Lot (SCAL) which allows electronic cutting machine users (originally that included the Cricut) to cut .svg files.  This was awesome because it not only allowed one to purchase individual .svg images for a few dollars each, but it allowed one to cut 3rd party images and fonts, thus greatly expanding the paper crafter's creative control.  Personally, I love the images from SVGCuts and artists like Kerry Bradford   and Carina Gardner.  Heidi Swapp has even realized some of her handwritten words in .svg files and I ADORE that woman's handwriting.  Thankfully, I bought SCAL2 several years ago because the current version of SCAL-SCAL3- cannot be used with the Cricut...all thanks to Provo Craft.

Heidi Swapp "Words:Enjoy"
free
Provo Craft didn't want to allow their customers to be able to use SCAL, claiming "Intellectual Property" while they continued to push their expensive cartridges.  Provo Craft sued Craft Edge, who agreed to remove the Cricut platform from their software; SCAL3 is not compatible for the Cricut.  Provo Craft tried to appease their customers by first releasing the Gypsy-which I never owned but it looked like a hot mess and difficult to use.  The biggest downside I saw was that it didn't allow anything more than manipulating (welding or layering images) the still-expensive images from those cumbersome Cricut cartridges.  It still didn't allow 3rd party designs which to be frank was the one thing that we all wanted to be able to use.  You can read more about Cricut's Dumbest Business Move To Date here.

With so many other cutting machines to chose from, customer's began abandoning their Cricuts for the Silhouette's Cameo and SD, Pazzles Inspiration, and Sizzix eClips.  As Provo Craft lost market share in droves, they released their own web-based digital format called Craft Room.  This allows the purchase of individual images but only those from Cricut's inventory...still no 3rd party designs.  UGH!  The one thing they did with Craft Room was to begin offering some of their images for rent.  Right now you want rent the Holiday Basics Bundle with over 700 images from 10 cartridges- for $19.99 for 60 days.  Have a birthday party coming up? You can rent the Celebration Bundle for 30 days for $9.99 which includes 10 cartridges.  Score 1 point for Provo Craft.
Kerri Bradford
"Jingle All The Way"$1.29
***Obviously, a lot of Cricut users want to get ahold of an old copy of SCAL2, I see posts in various forums all of the time.  Where there is demand there will be there scammers pretending to supply...aka there are listings on Ebay.  The catch....SCAL2 can only be loaded onto 2 machines and it has not been available for quite a long time, sooooooo it is unlikely there is a legitimate copy still floating around...in other words don't waste your money***.

There is some evidence that Cricut might be moving toward a platform that allows individual 3rd party designers to sell files for the Cricut, but who knows. 

Now back to SVGCuts.  This company is owned by Mary and Leo- a couple from the Chicago area who produce a "kit" of digital files almost weekly.  You can read more about SVGCuts here .  You can read more about SVGCuts here and their approved cutting machines here.  Leo has produced a lot of tutorials for using .svg files with the various machines and how to manipulate the files in SCAL2 or 3.

They just won the Martha Stewart Maker's Audience Participation Award AND GOT TO MEET MARTHA.  Yes, I am calmed down.  Ok....where was I?  Oh right,  Mary and Leo...they won and I was so proud- they are the only company out of the hundreds in the contest that had even heard of.  Oh,  and they got married in the middle of the contest.  You can read more about Martha and the Maker's here.  You can shop at Martha's Maker's Pop Up Ebay shop as well. They have a rotating lineup of American made, small business products.  

For this rosette snowflake, I used a file in the Christmas Ornaments kit.  Each SVGCuts kit contains multiple projects, in this case 5 ornaments-and sell for $6.99.  However, each new kits is released as a "free gift" with a $9.99 purchase so keep a wish list and always buy 3 at a time for the best value- pay for 2 and get one free.  Kits often contain a card, a scrapbook page, and one or two 3-D projects.  While I do buy images from other designers, Mary's are the most detailed and she makes well-done assembly videos for the 3D and complicated projects.  The design team is pretty talented as well and it is fun to see what they make using multiple kits.  Check out Thienly Azim's designs  They are insanely creative.  So much so that I often check out each element to see where she got it from because it is always crazy and something I would never have imaged.  
I cut the ornament exactly as it came.  Then I added the tinsel and embellishments.  The tinsel came off a garland- there are lots of fun garlands this season which can be pulled apart and used for the tinsel.  I throw away the thicker pieces- I don't like the look but you can use whatever you like. You can see more about how I destroy garland here.  Scroll past all the 4th of July cupcakes to see photos of deconstructing garland.  For this ornament I actually cut the tinsel to 1 1/2 inches before I glued it into the rosette using hot glue.

Don't have SCAL2 or a Silhouette? Never fear, you can still make a similar ornament.  This is about the layers- a star, the rosette layer and the circle and star top layer all sandwiched with tinsel.  You can use die cuts for the various shapes and hand-fold a simple rosette.  You can layer one of Tim's Rosette Snowflakes rather than the one I cut.  Play with it.

I have to admit that I had my Cricut for years and had really not cut much with it- I was terrified of it.  It had all these buttons and very few instructions.  When I did the wedding this summer I needed A LOT of rosettes so I sat down and figured out who to use the damn machine.  And today I am proud to say I am a cutting fool.  All this means is you should expect a lot of paper projects in the near future.  I will never stop stamping, but I like to play with paper and this is another way to do that.  I sit and stamp while I load mat after mat into the Cricut.  I scored new mats at Hobby Lobby so I have 6 and I just load the paper and go for it.  

When the mats start to lose their stickiness...or too much glitter ends up on them- I use a system from Crafter's Companion.  Their Die-Cutting Mat Refurbishing Spray Bundle sells for $19.99 and really works.  I spray the mat with the adhesive remover and let it set for 10 minutes or so before I start to scrap off the gunk.  I found using an old credit card works well to get the majority of the goop off.  Then I respray and use paper towels or the credit card until the entire mat is clean.  Finally, spray with the new adhesive.  This adhesive doesn't last as long as the original mat adhesive but I find I can respray several times before I have to remove the adhesive and start again. 

So have fun.  Enjoy the season.  Ho Ho Ho.

Thursday, November 28, 2013

Mrs. Claus' Boots

I am loving Tim Holtz's new Alterations Ice Skating Die and I haven't even used it to make ice skates yet-though that is coming.  Today I used to make Mrs. Claus' boots.  Originally, I wanted to make Santa's boots but upon seeing the finished product I realized they are NOT manly enough to be Santa's boots but are perfect for the wife. 

This photo is form the packaging of the die itself.
I turned them into Witches' boots last month.  
 I love them as Mrs. Claus' boots.  I die cut the skates from Grungeboard.  To embellish them I first cut the blades off and painted the entire boot with Black Soot Crackle Paint.  

When the paint was dry, I added Glossy Accents to the main portion of the boot- avoiding the area around the laces and the heel-and covered it with Black Soot Distress Glitter.  Tim likes to say it looks like glass glitter, but...not so much.  While making the boots, I was also making a pair of skates (for later) using real glass glitter on the blades.   The two sat next to each to dry and I'm sorry to say that the Distress Glitter looks nothing like glass glitter.  However, it is gorgeous and very, very sparkly and I am finding the colors, while at first I thought them a little weird, are perfect and really do add to my projects.  So, I am no longer ONLY addicted to Martha's fine glitters.  Distress Glitter doesn't fly away or static-stick to everything, two huge bonuses. 
When the glitter was all dry I added small back crystals to the area where the laces would go to mimic buttons.  
 I shot another photo-in better lighting- as my husband was packing the car to head to my sister's for Thanksgiving dinner.  You can see the effect of the Crackle Paint on the heel and around the buttons.  

The fun fur trim is actually a mini marabou (from Hobby Lobby) that I simply hot glued into place. 

I hope everyone in America had a terrific Thanksgiving with good food and great company.  I sure did.

Monday, November 25, 2013

November 12 Tags of 2013: Joining Chalkboard Craze

Ok...maybe it is because I haven't touched a craft supply in a month or maybe it was stamp choice or maybe it is because ONLY Tim Holtz can make this technique really work...I have no idea really but my attempt at Tim's Chalkboard Technique was mostly a fail.

Tim made this:

It looks easy enough.  The "trick" (or so he claims) is using Antiquities Frosted Crystal Embossing Powder.  

I have that powder. 

I used that powder.  

I got a hot mess.  
First, I tried it on Black Chalkboard paper. What you are seeing is in fact 3 pine trees and snowflakes ...maybe if you squint?  No?  Try moving the screen back a little?  No?  Hmmm...Ok, so let's try a different stamp.  Maybe it wasn't a good design choice.  Maybe a nice simple line stamp?
Nope!  This is even worse.  The dress all but disappeared (this is also the chalkboard cardstock).  On the other hand, I LOVE the snowflakes (more later).
Third times a charm?  Maybe....this is better at least.  I gave up on the chalkboard cardstock and switched to Ranger's back tags.  This design uses several stamps from Rhonna Farrer's Christmas release from last year.
It is the bird on a complicated swirly nesty thingy, the words "Joyneux Noel" and some random stars.  Can you see that?  I love the images and by adding the crystals...
...I think it looks ok.
My final installment was made using a big bold stamp Tim's that has images of vintage Christmas advertisements called Holiday Past.

Holiday Past Cling Mount Stamp Set
I looked better with the chalk, but it made a very boring card.  So I added the sentiment and jewel.  Now you can hardly see the chalk.  What can I say...I cannot leave it undone!

I lay here trying to figure out if I should try again-I threw a few others away without even photographing them- or give up.  I decided to see what other people were doing by checking the Linky on Tim's blog post.  What I found was that the tags either looked worse then mine or looked awesome. Upon further investigation, I found that probably 95% of the "awesome" tags were made using white embossing powder and in fact no chalk was used in the making of the product.  Well, I could have done that!

What I did love about this was the pretty sparkly snowflakes from this tag fail.
I think it is the black cardstock-something that I am not used to using for Christmas designs- with the silver glitter that had me at hello.  I used Ranger's Sticky Embossing Powder and Martha Stewart Fine Glitter in Silver.  After I got disgusted with the chalk technique I played with the glitter and made this...

The camera never picks up all the sparkle.  Maybe I should make a Vine for you.  In any event you can be sure you will see more of this before Christmas is over.  I guess something good came out of my chalk nightmare.  

I hope you day is filled with Sunshine and GLITTER.  Mine will be!


Sunday, November 24, 2013

I'm Back...

So...I have been gone awhile.

FIRST, I didn't feel well...AT ALL.

THEN I sliced my finger and had to get 4 stitches.  I can laugh about it now but that night...Ugh.  I was home alone with my 8-year-old, Rick was due to get home in 5 hours but the house was still a mess, dishes not done...you know all those things I intended to get that done right before he gets home.   With no other adult in the house, I had to call my neighbor, Heather, to come take me to the ER and her daughter, Kristen, to please come watch Chase.  Thankfully, Heather is that kind of neighbor and they came right over.  Ryann was at a movie with the boyfriend on her first "date".  Kristen texted Ryann "I'm watching your brother while your mom is at the ER".  You know where this is headed... I get a panicked TEXT from Ryann.  Jeez, you would think the situation would warrant a phone call-her entire generation hates speaking on the phone!

THEN I went to my sister's and saw the amazing P!NK Truth About Love Tour for the second time. The first time we saw her last spring we bought tickets the day of the show and literally sat at the very top of the venue.  Literally, in a folding chair on the edge of the top level.  This time
we saw the show FROM THE FRONT ROW...OMG I cannot even put into words what that experience was like.  She is such an amazing performer but seeing it up close, seeing every facial expression, every dance move...was just perfection.  Karma worked in my favor.... from the last row to the front row.  
The woman has some RIPPED abs.  Why?  Because she does this while she sings
We were so close I actually couldn't get a good photo.  Through the entire show she is LIVE singing while performing circus tricks.  It is insane and yet she sounds AMAZING.
Part of her opening number.

THEN my daughter, Ryann, had her first winter formal and I was busy with shopping for dresses, getting nails done, and thanks to my friend Brandin and the wedding-for-free-hair deal, Ryann had GORGEOUS hair for the dance.
THEN our power went out for 5 days this last week.  Hard to craft when it is 50 degrees in the house and no lights.  After freezing the first night and next afternoon, I packed up the kids and we ended up staying at a hotel for 3 nights.  Rick was...conveniently...flying a FedEx jet all over the country so he missed the fun.
I came home Thursday to power and had to immediately empty the fridge and freezer right into trash bags...
...the only positive that can be had after a power outage...a clean freezer.

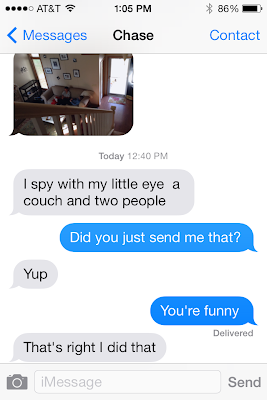
Whew... you are all caught up.  Oh, one more thing.  This text is from my 8-year-old Chase.  It still cracks me up.  The picture is Ryann and her boyfriend. It was his first visit to the house and my sister wanted a picture so I told Chase to sneak down and get it.  He grabbed his iPad Mini and snapped this...she never knew.  A month plater he send me this text....
The kid cracks me up.  

Hope your day is filled with Sunshine and GLITTER.

Come back tomorrow for my 12 Tags of 2013 November Edition.

Thursday, October 31, 2013

Happy HavaLeen

I have probably blogged about this before but my son always used to call it "Havaleen".  Some of my children's adorable baby-speakisms just never leave my head and "Happy Havaleen" is one of them.  The weather in Michigan is CRAPPY with a capital C.R.A.P.P.Y.  They are predicting a 100% chance of rain (fortunately just regular water and not jellybeans).  The bad new is storms are predicted to  start around 4:00.  Terrific.

I spent a small fortune on candy. We have a really fun neighborhood for trick-or-treating.  The subdivision has a clear border and it is just big enough for a nice big candy haul without being overwhelming.  Lots of moms dress up to hand out candy (hmmm, hmmm I will be a rainbow fairly thingy).  Several families build fires in their little portable outdoor fire pits, round up chairs and sit in their driveway handing out goodies.  A few even hand out alcohol to the parents....a treats all around.   Because we are so much fun.... lots of people drive over just to trick-or-treat here.  Every year someone brings a wagon load of people pulled by a tractor.  I must say, it is pretty fun.  I have tried to take pictures in the past but it is impossible in one frame to really get a feel for just how jubilant and busy the neighborhood gets.

Lots of trick-or-treaters means I bought a ton of candy (running out is just not an option).  If the storm is bad and trick-or-treating is a bust, I will have 1000's of little candies in my house.  That is NEVER a good thing.  I can't even send them to work with the husband- he flies for FedEx so it would be him and the Captain eating the 1000's of candies.  Better him than me I guess but still....
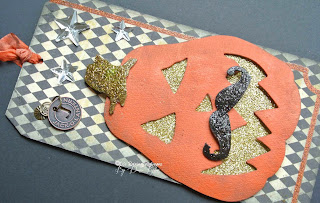
As I worked on the October tag for the 12 Tags of 2013, I was trying to find something to fit in within the frame.  I thought I had the small pumpkin Tim used-come to find out, I don't-but as I was going through all my dies I found the Mini Scary Jack-O-Lantern (the face) and the mustache from Mini Mustache and Pointed Finger and I HAD to try it.  

I die cut the pumpkin from Grungeboard using Alterations Pumpkin Jack and painted it using Ripe Persimmon Distress Paint.  In the photos it looks like the Grungeboard is peeking through the paint but it is actually Black Soot Distress Ink that I used to edge the pumpkin.  The face holes are backed with glitter paper to mimic candlelight- who am I kidding, it is just an excuse for adding GLITTER.  

For the mustache (also Grungeboard), I applied Glossy Accents and Black Soot Distress Glitter.   I attached the mustache using hot glue only in the very center.  This allowed me to bend the ends to give it some dimension. The stem was glittered using Glossy Accents, Shabby Shutters and Brushed Corduroy Distress Glitters. I simply used a pinch of glitter at a time, sprinkling them over the area unit it was covered.  More hot glue was use to attach the stem to the pumpkin.  
It has been a long time since I used a patterned paper for a tag background but this paper is just so gorgeous and lends a vintage vibe to the piece.  As usual, I edged the tag with Black Soot Distress  Ink before using foam tape to attach Jack.  Embellishments were kept to a minimum so as not to distract from the whimsical Jack.  I added an Idea-ology Ring Fastener to the tag and attached an Idea-ology Jump Ring and Idea-ology Halloween Muse Token.  Idea-olgy Mirrored Stars were glued on with Glossy Accents and I dyed white seam binding using Ripe Persimmon Distress Stain.  That's it.  

Happy Havaleen.  Hope yours is drier than mine looks to be!

Wednesday, October 30, 2013

Witches Shoes Tag

Every Witch needs a great pair of boots and a fancy gold broom.  
The boots were cut from Grungeboard using the Alterations Ice Skate die. 
I snipped off the skates and painted the remaining boots with a generous coat of Black Soot Distress Crackle paint.  After that dried I covered the entire thing with Black Soot Distress Ink using a Blending Tool to brighten the color.  The heel was made glossy by adding Glossy Accents.

I added alternating purple and green mini eyelets along the edge and added Black Tinsel Twine for the lacings.  I attached the boots to the card using hot glue and foam tape.
The broom was made using part of a bamboo barbecue skewer, washi tape and gold tinsel.  I often use tinsel in my projects.  Simple pull apart a tinsel garland and hot glue pieces to the stick until it was full and looked like a broom.  THen I hot the tinsel with the heat gun to make it curl.  Not all tinsel reacts this way so practice first. 
Hope your Halloween is filled with Sunshine and GLITTER.