Wednesday, December 28, 2011

Tim Holtz Watch

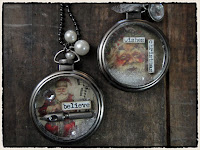
I had a Tim Holtz Idea-ology Pocket Watch in my stash, unopened for the last ….well….forever.  I really didn't know what to do with it.  Then Tim posted this picture and a little video how-to about the watches.  I couldn't get the idea out of my mind. I had the one watch but I needed more- I usually make something for my mom, grandma and sister for the holiday.  I ran to Michaels and they have 2 left.  Unfortunately, I don't have any local scrapbook stores and my local stamping store is hit or miss for non-stamping items like this.  The watch can be found at Michael's or online.  I found them at Two Peas in a Bucket for $7.99.
I made the first tag using Tim's Idea-ology Holiday Paper Stash.  I traced the back of the pocket watch on to the image I wanted.  I added coarse glitter (like, Duh!) to Santa's beard and hair and a small amount of fine glitter to his hate.  I had some tiny brass numbers in my stash that I got from an Etsy seller- can't remember which one.  I added some  glitter to them as well because I didn't like how flat and boring they looked.  
The second watch I made for my 96 year-old grandmother.  She loves using pins and earrings to jazz up her wardrobe.  The background of this watch is part of the word "Merry" as in Christmas from Rhonna Farrar's Christmas Junque Printable Background Kit available here.   Actually, I used a piece of scrap paper from my Christmas cards.  I am so in love with this paper and I hope she makes another version that isn't holiday specific.  The tone-on-tone... the awesome font…. it is just BEAUTIFUL.  Anyway, I embellished that gorgeous paper with the word "joy" cut from an old dictionary (topped with a little glitter), the same "2" and "5" from my tiny brass number stash, a snowflake button with the shank removed and a tiny piece of a snowflake from the branch I used in the package adornments.  Because I thought it needed more- I added a tiny jingle bell and a small Swarovski crystal hanging from a flat-back pearl.  I think it looks really elegant and perfect for my grandma.

The final watch I made for my mom using more of Tim's holiday stash paper.  First, I used a piece of a vintage French text...um…dictionary..no, um… story… some kind of book... I have no idea what type of book it is because I don't read French.  Truthfully, I think it is simply a book of fiction.  After the background was in place, I grabbed Tim's paper and this time I decided to cut out the little pieces to resemble boxes.  Tim uses actual vintage items to inspire his papers so it is fitting to cut them into their individual parts and use them as they were originally, no I cna't use them as a box but I  can make them look LIKE a box.  To keep it all intersting, I used a piece of cardboard to raise the lower "shiny brite" box up off the background.  I used a small amount of glitter on the bigger shiny brite ornament box and the top box got hit with Glossy Accents.  Somehow I lost the little wire that goes in the top of this watch.  When I find it I will replace it.  

I am addicted to these little watches now that I have some ideas on how to fill them.  The watches can be hung from a cord or chain to become a necklace (or even an ornament) or can be made into a broach.  I made all three of these into broaches per the request of the recipients. Using E6000 glue I simply glued the pin backs right to the back.  Really an easy project.

For more fun Tim Holtz inspired jewelry at Studio L3 blog.  To see all things Tim visit his blog.

Laters….

Tuesday, December 27, 2011

My Beautiful Packages and How I Really Feel About New Years Eve.

I Love, LOVE, LOVE Christmas.  For me it is a wonderful family holiday that starts in early December when I start to buy gifts for my loved ones. I love finding the perfect gift.  I am not one of those people that can just grab something and move on.  I have to find something I know the recipient will love.  My ideal Christmas Eve involves cocooning inside with my family- we are always at my mom's- and just relaxing.  I usually end up scrambling to wrap the final gifts since I have a small-ish car and can't waste space by hauling pre-wrapped gifts.  Christmas day is all about gifts, kids squeals if delight, homemade cinnamon rolls, and a big dinner.  This year almost everyone got an iSomething so the afternoon was quiet and full of iPods, iPads, and MacBooks.  

New Years, on the other hand, meh, ain't my favorite.  I don't know why…maybe because my Fed Ex pilot hubby is NEVER around or if he is, he is too exhausted from just getting home from a big trip to actually enjoy the night.  Maybe because I live in snow country and have no desire to go to the big town party which is outside.  It's hard to say why I don't care about New Years Eve but I don't so while every blog I love is already posting party ideas and free printables for the holiday,  I am going to show you my gorgeous Christmas packages.

My Christmas wrapping had 3 different themes.  Why 3? Because I made one that I loved and showed before with the teal flowers and ribbon.  Then I took Margie's class Spark Your Christmas and she showed how to make a Junque bow.  Junque bow training has changed my life.  I am head-over-heels with them and ended up making two different color schemes.  The problem was I just couldn't stop making them so I had tons for the packages and several holiday decor items are now embellished with Junque Bows.  
 
First I made the beautiful silver, brown, and gold Junque bows.  I literally used ribbons from my stash…ribbons of Christmas past if you will… and tinsel garlands.  I didn't have as many textures as I would have liked- as Margie does- but I will next year!  I ended up using these bows to embellish the gifts for the men.   All of the adult packages were wrapped with plain kraft paper and I simply hot glued the bow right to the paper.   


After I made about 20 gold/silver/brown bows,  I realized I had a lot of red polka dot and red stripped ribbons that I bought for my living room decor before Spark Your Christmas inspired me to completely changed my decor to white, silver and gold.  I grabbed those gorgeous ribbons, some silver tinsel and, in what I can only call a stroke of genius, a bunch of candy canes that I had intended to put in apothecary jars and place around but no longer had a use for.  I wired the bows and hot glued the candy canes into the center.  I used the bows and the red and white wrapping paper to wrap all the kids gifts.  The paper came from my stash….bonus!
The red and white color scheme, the paper covered with typography and the candy canes made for really cute wrapping for the kids.  An unplanned advantaged was that it was very easy for the smaller kids to open the packages because I hot glued the bows in place without wrapping the package with ribbon first.
 The women got packages wrapped with kraft paper and the beautiful blue/teal adornments I made in early December.  I did wrap the packages with teal seam binding first.


 I love the way these looked.
This is the package my husband wrapped for me.  Notice the beautiful paper, the tight corners, the sweet little gift card….the grubby pieces of tape.
Notice the gift card it was an index card folded in half.  Ok, so he isn't nearly as interested in beautiful packages as I am.  He is interested in terrific gifts….a new camera for me.

Laters…


Tuesday, December 20, 2011

Holiday Tags

My sister asked me to make some tags for her to give to a friend who received some at a party that were somehow misplaced/stolen/lost.  Sis felt bad because her friend was so excited to receive the tags in the first place.   She asked for half Christmas, half generic.  I can do that.
I used plain old manilla shipping tags from Office Max, digital artwork from Rhonna Farrar,   and Heidi Swapp from House of 3 days, Distress Inks, and ephemera I had at home.  

It is easy to make the actual tags.  I used Photoshop and brushes- Rhonna's digital artwork and Heidi's handwriting- but you could just as easily use text or clip art and Microsoft Word.  Using Photoshop I made the each tag individually then I put 4 tags on a page to print them- using a letter size (8 1/2x11) paper.  You will want to print out the tags first on regular computer paper-whatever you normally use.  You will be taping your shipping tags directly over the designs on the printed computer paper and running it through the printer again.  To do this you will want to use temporary tape applied to the computer paper- not the tags.  I like to be sure the top of the tag is secured to the printout because as the printer feeds the paper in it could catch on the top if it isn't well secured. You don't need to worry about the bottom of the tags  as they won't catch on anything.  You can use regular tape if you stick it on to your clothes first to reduce the stickiness.  Be sure to line up the shipping tags exactly over the designs on your printed page.

It is important to know which way your printer feeds the paper; if you don't know you can place an "x"  in the top left corner of a sheet of paper placed face up into the printer and note which way it faces when it comes out.  Be sure to place your paper with the shipping tags attached in the correct position so that it will actually print on the tags and not be upside down or backwards.  
After I printed my tags I added  few embellishments.  I added green and red rhinestones and tinsel to the Reindeer tag above.  The h tag received a line of silver glitter tape, pink tulle and pink seam binding.
I LOVE the Christmas Joy tag.  I simply added the red seam binding and small red rhinestones and a tiny little ruffle of white crepe paper edged in white gold glitter.
The Happy Holidays tag is minimally embellished with tiny red and green rhinestones and red seam binding.
Another tag I really love, Noel I embellished with a ruffle of vintage paper and white gold glitter, red seam binding, and vintage bells.
This tag, Joy to the World is my favorite.  I am so head-over-heels in love with this tag.  First I love the digital design- it started with a background paper from Rhonna's Christmas Junque that is hard to see because it is tone-on-tone but it is made up of Christmas words using a really funky font.  I added some distress brushes in the same tone-on-tone and then a definition (it is a random word; I used it because I like the way the text looks on the tag rather than for the word).  Next I added the large Santa design (another brush from Rhonna) and the "Joy to the World" in Heidi's handwriting and the "To/From" are just a font.   After I printed the tag, I added the tissue tape ruffle along the bottom and the GORGEOUS deep red velvet ribbon trim.  I added more of the velvet ribbon and some tinsel to the top of the tag.  Finally, the 3 white pearls add a whimsical touch.  Divine.

I love this tag so much, I decided to use this design to make my Christmas cards…and Yes, I know it is really late to still be designing my cards... give me a break.  I haven't even sent cards for 3 years, I think it's been 3 years, so I am doing better than average here.

Happy Birthday to my beautiful daughter who turned into a teenager today.

Laters….

Monday, December 19, 2011

Joyeux Noel Again and a Star


Ok, so I posted several times that I can't spell and then proved it by spelling Joyous Joyeux Noel wrong.  Ironic because I spelled it correctly in the painters tray that I made but when I made my Garland I was panicking because I thought I had 1 "E" and somehow in my panic I convinced myself it was spelled "Joyoux" and went merrily on my way glittering chipboard letters.  I joyfully posted the pics, wrote a post and moved on, enjoying my mantel vignette until 2 days later I was running out the door and noticed the "Joyeux" on my painters tray.  Hmmm?  Which is correct?  Maybe there are two ways that are correct?  Ah… No.  I misspelled it.  Finally today I found another "E", glittered that puppy up and snapped some new photos.

I also finished my second little tree with the vintage paper and pearl-head pins which I am completely smitten with.  Finally, the other big change is the star that I made from directions in this December's Martha Stewart Living issue.  It is big and glorious and all glittered.  Divine.

Laters...

Sunday, December 18, 2011

10,000 Page Views

I'm doing the happy dance…I got 10,000 page views.  No, not 10,000 per day…not 10,000 per month…but still a big deal to me.  It has only been the last several months that I have tried to get new readers so I'm proud.  And doing the happy dance…..
 My first giveaway is in the books and I am 50 pageviews from 10,000.  It might be pathetic but you cannot imagine how happy that makes me.  I never thought I was a writer and while I still don't think I am a GOOD writer- my teenage (she turns 13 this week!) can write circles around me- I have realized that I can write well enough to share my creative life.  Why did I think I couldn't write?  I am a nurse and we write things like "Pt alert and oriented x3.  Pt ℅ SOB, RR 30, HR 88, BP 100/75. O2 Sat 90%. Xray positive for infiltrate; started on PCNG IV"  What?  Did you call your patient a SOB?  What the What?  Oh, what I meant was "Patient Alert and oriented to person place and time.  Patient complains of shortness of breath (Oh… SOB) blah blah blah".  Not exactly flowery and descriptive is it?  That fear of my inability to write kept me from starting a blog for probably a year.  Yes, I have a lot to learn and no, I can't spell, but I'm learning and trying and having a great time.

The giveaway winner is the author of comment 13 "Gwen".  I contact her via email.

Enter a lower limit: 
Enter an upper limit: 
    
Random Number:

I will be back with more holiday projects.  Can you believe it is less than a week to get everything done?  YIKES

Laters….

Saturday, December 17, 2011

Holiday Cards and a Give Away

I am having my first give away today!  But first, my project….cuz it's all about me you know.  ME, ME, ME.  I joined a card exchange hosted on the blog Brooklyn Bride.  Why was I on a bridal website?   No idea… I must have clicked over to it for a project or something from another website or an email.  It is a great blog with lots of great ideas... and one card swap.  This was my first card swap.. Hard to believe since I have been making cards since before there was a stamping industry.  I made cards in the early 1990's using a candle flame or stove burner to melt the embossing powder.  Imagine the sheer number of cards I burned….. Cuz you know I am not careful with things like that.  Impatient?  Yes….Careful?  No.

I am happy with the way the cards turned out.  Since I only had to make 5 cards I didn't mind a labor intensive design.  My muse was a luminary that I saw in the December issue of Martha Stewart Living using the Martha Stewart "Star" Anywhere Punches.  Immediately I had the idea to do a dark background with the stars punched out and a silver, glittered paper behind so the stars appeared as silver glitter.  I intended to use foam tape or a pop dot between the two layers to add depth but in the end i didn't like the look and laid the black card stock directly onto the silver glitter paper.


I had to send one card to Portugal and one to Ontario.  The other 2 went stateside and I did send one to the woman hosting the swap.  I managed to get them in the mail today.

On to the SWAG.  I have a Give Away from the online scrapbooking company Stop and Scrap.  I LOVE the company and have proven my love by shopping there quite a bit this year….shut up Rick!… as I was saying, I have shopped there quite a bit this year because their prices are fantastic.  Stop and Scrap is a 4 year-old company that specializes in selling brand new scrapbook lines as they are released.  They are the place to go to get the latest in the industry.   I know from being a customer that this year they have seen tremendous growth and they recently expanded both the business and the family with new partners and a new baby.   Stop and Scrap offers a tremendous amount of pre-orders ensuring you get the hottest products before they sell out.  For crafters like me who live in a town with no local scrapbook stores, having a resource like Stop and Scrap has been very valuable.

I am giving away a coupon worth $25 off of a $50 purchase for one of my readers (coupon good for 30 days).  Leave a comment today (up until 11:59 p.m. EST) and I will pick a random winner tomorrow.
But that is not all…. There is also a coupon available for everyone to use for $5 off a $25 order good today only.  Use code JELLYBEANS.

Don't forget to leave a comment…
Laters...

Monday, December 12, 2011

Joyoux Noel: My 2012 Mantle

Yesterday I teased you with a quick peak of my 2012 mantle and reminded you of the ridiculously bare 2011 mantle that I thought was The Bomb.  Today I shall keep my promise and here is my Joyoux Noel.    
I'm head-over-heels in love with it.  


 The bookcase opposite the mantel provides another place for me to decorate.


More decorating and projects to come…
Laters...