Monday, March 14, 2016

12 Tags of 2016 Technique Remix: March Photo Edition


I know that my blog posts can be a tad.... WORDY .  I also know that not everyone wants to wade through my novellas every time I post a cool project.  The thing is, I like to teach...I am always so excited to share what I know about a new product or what I learned (maybe the hard way) about a technique while I made the project.  But 2016 is the Instagram Generation and people often just want to see photo and move on to the next one. People are busy, I get that, so I have decided to try something a little different...maybe make everybody happy!?!?  I will post BOTH a full-length post and a "Photo Edition" made mostly of photos. The full-length post will include all the information, education, and links that I like to share without all that guilt that I am writing too much and taking too much of your time. The Photo Edition still too long for you? I recommend Instagram (DaneeKaps).

So let's start with the first Photo Edition...

Below is Tim March Tag for the Tim Holtz 12 Tags of 2016 Technique Remix:
2016TAG
Photo from TImHoltz.com


I like to make 1 or 2 tags pretty much exactly like Tim's version in order to practice the techniques. Tim likes to really load these tags with new ways to use products and the best way to learn is to actually  do it.  Then I like to make a few tags my own take on the design...changing up colors, imagines, embellishments..whatever strikes me...but always keeping the overall design elements the same cuz otherwise you aren't using his tag as inspiration.

Notice the gorgeous gold metallic splatters over all the tags? You can see them in the close up below...


*******Check out my WORDY full-length post here 

Laters....
12 Tags of 2016: March A VERY Long Version

I am on a roll this year....third month in a row I managed to play along with Tim Holtz and his 12 Tags of series.  Twenty Sixteen is the year of the Technique Remix.  Each month Tim revisits 2 tags from his 12 Tags of....2015 or prior.  He updates the techniques or uses newer products and then merges the two into one amazing tag. This month he Remixed "Textured Surfaces" and "Dimensional Die Cuts".

This is my first full-length post under my new "policy" of doing both a photo-heavy short post and a longer full-length post with all the details inside.   Hopefully this will meet everyone's needs.  This is a REALLY long post even for me and at least partially because I have a lot to say about the new Distress Crayons.  I realize that not everyone wants to read this encyclopedia-length post so I labeled everything to make it easy to find the parts you are interested in.

Let's go...
I always like to start by showing Tim's tags.  With the new Technique Remix it is fun to see where we started so let's begin with the original tags:

Behind door #1 we have the November 2014 tag, Textured Surfaces.... a beautiful autumnal leaf which brings to mind blustery days, pretty scarves, and Pumpkin Spice Lattes.
Photo: Timholtz.com
Textured Surfaces is the ultimate technique when you want something super grungy and dirty.  The color layers allows you to basically go in any direction- you can keep it dark and dingy or brighten it up like the butterfly tags (below).  Manipulate and use the color layer can either emphasize the grimy industrial vibe or play against it with something light and airy....or anything in between.

Behind door #2 we have Dimensional Die Cutsa fairly recent technique originally seen in August of 2015.  This technique uses wafer-thin, chemical-etched dies called Thinlets build a background from the negative of the dies. The beauty of this technique is that water-thin dies are available in thousands of designs meaning this technique can be used for just about anything you can imagine. I will talk about this a lot more below.

Here is Tim's March 2016 Technique Remix tag:
ME, ME, ME, ME ME ME MEEEEEY It's all about ME....
MY DESIGNS: 
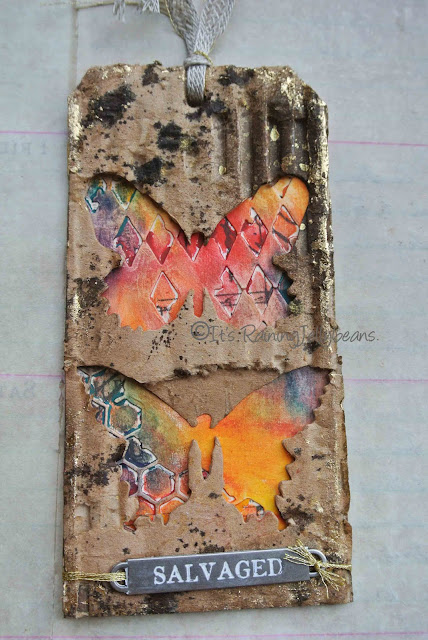
I shall begin by stating the obvious... this one GRUNGY ol' design... I am talking disheveled, trashy, dilapidated (yes, I visited Thesaurus.com).  Let's be honest, it is probably the grungiest tag I have ever made.  Since I don't usually go so far down the rabbit hole  Trashcan (think Oscar not curbside), I decided to copy Tim's version as closely as I could before wandering off and changing things up a little.
TEXTURED SURFACES:  
The tags above and below are both made using the same die that Tim used, The Butterfly Duo Bigz die. Tim mentions in his post that this die is made to fit perfectly on a #8 tag. I am always impressed- and grateful- that Tim pays attention to such tiny details when he designs for his various product lines. 
THE REMIX
This grungy, mixed-media technique was updated for 2016 by changing out the coloring medium from Distress Paints to the new Distress Crayons.  In his original tag, Tim used Distress Paint and what is basically the Wrinkle-Free Distress Technique.  The technique is easy and fun to do, simply squeeze out blobs of Distress Paints- at least 3 colors for the best effect-on to a nonstick craft mat, mist with water and swiped the tags through the color until the desired look is achieved.  This technique can be done with Distress Inks, Stains, Sprays and Paints a mixture of products which is definitely one of my favorite ways to do this.  Distress Paint looks amazing because once it is dry it is opaque and no longer reactive to water.  Sprays, Stains, and Inks remain translucent and reactive to water when dry... mix them together and they combine for some amazing effects.

But enough about that because this Remix was all about the Distress Crayons.

DISTRESS CRAYONS:
Distress Crayons
The new Crayons are available in 3 color sets- Set 1(brights) Mermaid Lagoon, Mustard Seed, Peacock Feathers, Picked Raspberry, Spiced Marmalade, & Twisted CitronSet 2 (Earth Tone) Festive Berries, Fossilized Amber, Chipped Sapphire, Rusty Hinges, Peeled Paint, and Seedless Preserves; & Set 3 (Vintage) Antique Linen, Walnut Stain, Black Soot, Vintage Photo, Hickory Smoke, & Picket FenceSimon Says Stamp has the sets for $12.99 each and individual colors for $2.99 each; A Cherry On Top also has the sets for $12.99, is not offering individual colors at this time but has a deal on all 3 sets for $35.99 (A Cherry On Top often has promo codes so be sure to check their Promo tab or sign-up for their emails).  I cannot find anything that says how much product is in each Distress Crayon; the pigment is twisted down to to reveal more product. 

GELATOS
Gelatos
If you have been in the mixed-media world for any length of time, I am sure you have heard of Faber-Castell's Design Memory Craft Gelatos.  Gelatos are described as "water-soluble pigment sticks" and are acid free. They are often used to rubber stamp-simply scribble the stick directly onto the stamp and either stamp directly onto your surface or mist with a fine spray of water and stamp. The colors become more translucent when diluted with water.  

Collecting all the colors can get a tad confusing because they are sold in a crap ton of configurations. Let's start with size- Gelatos come in two size: Single Scoop (5.6 gms for $2.95).  There are 52 Single Scoop colors of which 15 are metallics.  Double Scoop (13 gms for $4.95)... wait...see what they did there?...gelato?....scoops? I love Ice Cream....okay FOCUS...back to the Double Scoops...Double Scoops are available in 18 colors.  

Here is where it gets complicated because all of the colors are available individually but they also come in a crap ton of sets.  A lot of the sets overlap each other so if you buy any of the sets, you can easily end up with doubles.  The obvious solution would be to only purchase individual colors while keeping  an updated list of what you own.  One of the biggest kinks in that plan is that those sets are often SIGNIFICANTLY discounted..it's had to walk by 75% off at Michael's.  Here is a quick look at most of the sets I found available online. If you aren't interested, scroll down to Distress Crayons vs. Gelatos 

GELATOS: 
  • 15-piece Gelato Sets: also 2 blending tools and a paintbrush in a clear case for $24.95
    • Metallics Include Silver Ice, Gold Champagne, Iced Chai, Iced Coffee, Metallic Melon, Metallic Grape, Metallic Icing (a stunning white), Iced Currant, Iced Rose and Iced Pear 
    • Brights: Red Cherry, Bubble Gum, Lemon, Mango, Margarita Mix, Lime, Snow Cone, Boysenberry, Lavender, Orange Soda, Passion Fruit & Limoncello
    • Pastels: Aqua Dolce, Coconut, Buttercream, Watermelon, Guava, Peach, Earl Gray, Caramel, Kiwi, Fig, Elderberry & Strawberry 
  • Gelato Color Gift Set contains 28 colors $62.95 Black, White, gold, Silver, Guava, Lavender, Bubble Gum, Red Cherry, Butter Cream, Lemon, Mango, Tangerine, Pistachio, Lime, Green Tea, Spearmint, Cotton Candy, Blueberry, Grape, Boysenberry, Peach, Butterscotch, Chocolate, Early Grey, Metallic Mint, A  water brush, 2 smudge sticks & 2 foam blending tools. 
  • Gelato Gift Set #2 Dolce Vita Contains 33 colors $62.95 Squid Ink, Aqua Dolce, Blood Orange, Banana, Snow Cone, Margarita Mix, Raspberry, Watermelon, Black Cherry, Iced Chai, Cinnamon, Iced Coffee, Caramel, Kiwi, Fig, Elderberry, Strawberry, Iced Currant, Iced Rose, Metallic Icing, Iced Pear, Orange Soda, Passion Fruit, Limoncello, Coconut, Black Licorice, Champagne, Silver Ice, 3 stamps, a palette knife and paintbrush
  • Gelato Double Scoop- contains all 18 of the double scoop colors available $59.95
  • Mix & Match- contain 4 colors, a brush and a small stamp $10.95
    • Yellow- Tangerine, Mango, Lemon & Butter Cream
    • Green- Pistachio, Lime, Green Tea & Spearmint 
    • Blue- Cotton Candy, Blueberry, Boysenberry & Grape
    • Neutral- Peach, Butterscotch, Chocolate & Earl Grey 
    • Red: Guava, Lavender, Bubble Gum, & Red Cherry 
    • Metallics: Metallic Melon, Metallic Grape, Metallic Blueberry & Metallic Mint
  • Designer Series 4 colors, a stipple brush & a dot dabber  for $10.45
    • Macarons: Kiwi, Fig, Strawberry & Elderberry
    • Masquerade: Black Licorice, Silver Ice, & Gold champagne, 
    • Steampunk: Iced Chai, Black Cherry, Cinnamon, & Iced Coffee
    • Tropical: Snow Cone, Watermelon, Margarita Mix, & Raspberry
    • Manhattan: Gold Champagne, Silver Ice, Iced Rose, & Metallic Icing
    • 50's Diner: Aqua Dolce, Squid Ink, Banana & Blood Orange   
    • Bali: Passion Fruit, Orange Soda, Limoncello, & Pistachio
  • Speciality Sets: There are several specialty sets that include various Gelatos & supplies $24.95
    • Card Making Set
    • Mixed Media Set
    • Design Set
DISTRESS CRAYONS vs. GELATOS:
How do these 2 pigment sticks differ?  How are they similar?  

Distress Crayons:
Distress Crayons, like all of the Distress products, contain a water-reactive pigment...however, when water is added to the Crayons, the pigment stays put unless you MOVE it with your finger or a brush. If the Crayon is dry then the pigment will act as a resist and the water will wick away from the pigment. Tim did a great demo of this here.  
Probably the biggest difference between Distress Crayons and other pigment sticks is simply the these amount of product you need to apply.  Distress Crayons require a very generous application of product in order to move the pigment around and blend.  Whether you want to simply fill in an area, you are going for a nice graduated blend, or you want to blend two or more colors together to get new colors, you need quite a bit of product on your surface.  This is where I have seen a lot of reviewers fail...they don't know this and when they treat Distress Crayons like Gelatos they don't perform well. Of course they aren't Gelatos and it is best to use and compare products according to the individual product's directions.
Close-up: Distress Crayon over Clear Gesso, Tissue Wrap & Manilla Tag 
I have struggled all week to write this LOOOONNNG blog post, bring to figure out what to put in it. Today I go to my YouTube Subscrption page and Sandy Allnook has done an excellent and well executed comparison of Distress CrayonsGelatos and Prima Oil Sticks.  You can watch it here. If you have never watched Sandy's videos she is a fine artist but her channel is a card channel so she does a lot of rubber stamping and right now she is doing a lot of watercoloring. I never understood shadows at all until I started watching her....I'm not saying I am great at them still but I understand them much better so check out some of her other videos.
Close-Up: Distress Crayon over Clear Gesso, Tissue Wrap and Manilla Tag
If you aren't in the mood to check out Sandy's video here is a little of what I learned about the Crayons. As you can see from my photos, the colors are rich, vibrant, and blend beautifully...if you use the right amount of product.  Tim used white Gesso as a base for his March tag, but I used clear Gesso-mainly because I had it and because I wanted to see some of the Tissue Wrap through the color.

Distress Crayons go on very smooth-Tim compares them to the consistency of lipstick and I have to agree. The colors can be smeared around with your fingers or moved with a water brush. I found a baby wipe removes a lot of color and wasn't my favorite way to move or blend color but did allow me to remove color in areas with either too much color or where I wanted to blend in more colors and needed to lighten up the area.  Distress Crayons can be layered on top of each other and either blended individually or mixed into new colors. The ability to blend 2 colors to make a 3rd is great because currently there are only 18 colors available.  
Close-Up: Distress Crayon over Clear Gesso, Tissue Wrap and Manilla Tag.
Also the Happy Accident Embossed Honeycomb Texture
Distress Crayons dry down quit nicely.  I love that once they dried, I was able to layer on other colors without ending up with a muddy mess because the colors layered rather than blended.  This is where I took advantage of removing color with a baby wipe...I layered colors while they were still wet so they blended then I dried the pigment with a heat gun and added another color overtop.  I posted the close-ups photos so you could see some of this detail.  Frankly, I am in love with these little pigment sticks.
Close-Up: Distress Crayon over Clear Gesso, Tissue Wrap and Manilla Tag
DEMO VIDEOS:  There are quite a few videos of Tim demoing the Distress Crayons at CHA last January.
DIMENSIONAL DIE CUTS:
Dimensional Die Cuts uses Thinlets Dies to cut a design directly on to a background and the NEGATIVE image is used in the design.  Depending on what Thinlet die is used, the positive images can saved for another project.  After the Thinlet Dies are cut from the background tag, Tissue Wrap is added to the back of the tag and Gesso is applied to the entire tag- including over the Tissue Wrap areas.  Distress Crayons blend out and together much MUCH better over Gesso (You can watch Sandy demonstrate this in her video).  Tim's project called for White Gesso but I used Clear Gesso on my tags. Why? Because I wanted to try it.

WAFER-THIN, CHEMICALLY-ETCHED DIES:
What is a wafer-thin, chemically-etched die and what makes it different from steel-rule dies? The so-called "low profile" dies are made using a chemical-etching process which allows for a much more detailed design than steel-rule dies.  
Dapper BigZ $19.99
wish BigZ $19.99
Tim first released Thinlets in his Alterations line in 2014, however they have been on the market for many years, including in various Sizzix lines.  Companies like Memory Box, My Favorite ThingsHero Arts and Spellbinders have an extensive catalog of dies in this format...including basic shapes, dies that match their stamps and just about every single die shape imaginable including 3D projects.  Over the last few years, wafer-thin chemically-etched dies have exploded on the market with many of the stamp companies like Lawn FawnWaffle Flower, Avery Elle Pretty Pink Posh, Simon Says Stamp and Mama Elephant releasing stamps with matching dies.  This allows those of us who suck at fussy cutting to avoid it all together!  Stampin'Up also has a large inventory of wafer-thin dies.
Gearheads Thinlet
22 pieces $19.99

Mixed Media
Chemical-etched dies are wafer-thin so they take up a lot less storage space than steel-rule dies. One of the best ways to store them is Jennifer McGuire's method.  She uses clear plastic sleeves from Simon Says Stamp (25 for $4.99). Add a sheet of magnet cut to fit and you have a perfect storage method. The dies stay nicely and neat arranged on the magnetic sheet; something that can be important with of the die sets that contain itty bitty dies or 22 pieces.  I haven't yet purchased any of the magnet sheets- they are a tad pricey- but that means I can't link you to a great source.

Another advantage of the chemical-etched dies is you generally get more for your money.  Just to quickly compare Tim's products: Most of the Bigz (steel-rule) dies are $19.99 each (Bigz usually include 1 design made up of up of 1 to 4 pieces or two similar designs such as Fleur-De-Lis and Eiffel Tower.  Alterations Thinlets contain 1 (Doilies)  to 51 (Mini Bird Crazy and Things) dies.

REMIX:
Mixed Media 2 
The Remix of Dimensional Die Cuts was achieved by using the new Mixed Media Thinlets. Tim used the cool Mixed Media 2 set (left) which I don't have that one yet so I used 3 of the dies from the original set (above right).  The Mixed Media Dies are amazing because they do not cut on the outer edges which allows you to cut the negative image anywhere you please. In the photo they look like they are attached but in fact the yard 4 separate dies.  I had an interesting mistake you can see on the close-up photo of the heart (above right). Because of the way I put the die through my Vagabond the honeycomb die didn't cut at all and instead it embossed the image.  Ok..I will be honest, I put it through upside-down as in sharp side up.  I have no idea if doing that will ruin the die over time-or destroy the cutting pads faster,  but it certainly was a happy accident.  By the way, I want to point out how cool the Distress Crayons are- that white you see in the heart above is not Gesso but the Picket Fence Crayon applied over the dried Chipped Sapphire and Seedless Preserves.


MY OTHER TAGS:
My next three tags were made using individual heart dies from the Movers and Shapers sets; 2 of the hearts came from Mini Hearts and the other from Mini Love Struck.  I simply lined them up on my Sizzix Base Tray, ensuring they fit within the confines of a #8 Tag before running it through the Vagabond.
I sprinkled a few of the stunning Moonshine sequins from Simon Says Stamp. The shine and reflection on the Moonshine sequins is such a fun juxtaposition to the grunged-out corrugated cardboard in this design.
I attached the Idea-ology Word Bands with gold metallic DMC embroidery floss.-and maybe a little Tombo Monoadhesive on the back of the metal embellishment for extra security.
I finished off all of the tags with a length of Idea-ology Linen Trimming and the same metallic gold embroidery floss through the top of the tags.
This final tag was made using Movers and Shapers Sized Circles lined up on the Base Tray in the same way the hearts were done.  I sprinkled on some of the gorgeous Moonshine Sequins and added the "hello" sticker from Simple Stories Carpe Diem collection to finish it off.
I am exhausted...that was a ridiculously long post.
1_334862_TH.JPG.jpg

COMING SOON;
How to add gold splatters without making a mess.

Laters...