I thought it would be nice to show close ups of all the tags I decorated. They are scattered throughout the house; most are standing in vintage frogs. I did find tiny frogs at Michaels if you want to forgo the vintage route. The vintage frogs are all beat up- if that isn't your look then head to Michael's.
This tag, on the mantel has an orange flag cut from patterned paper, a moon brad, part of a rhinestone spider web, and black glitter. The candle in the background is covered with silver glitter- it is reflecting the light from the flash making it look like a disco ball.
Again I used glitter on the bird and the word "Vampire". I added the little butterfly circle with a pop-dot behind it. There is a silver line spider web on the bottom. Love that detail.
I've wanted to make potion bottles for several years now. I bought the bottles last year at an antique store but I couldn't figure out what I wanted them to look like. This year I started crafting in September and got the bottles out early, sure that I would be able to make amazing potion bottles. There are lots of PNG or JPEG files available for sale on Etsy or other web sites but I wanted to make them myself. As the month went on, I kept finding other projects to do and no matter how well intended I was when I started each day, I couldn't get started on them. Finally, after tripping over them for 6 weeks, I decided it wasn't that I didn't want to decorate them, it was that I din't want to make potion bottles. I adore the ones I've seen online but I"m not a "potion label" kind of girl. Instead i just doecrated the bottles in a Halloween-y way…. and I LOVE them all.
Close-up of the bottle on the mantle. I added large circles made from book paper and inked
with Black Distress. The label was made with png files printed out on Presentation Paper. I added the
silver circles, the letters to spell "BEWARE:, inked all the edges and added the black sequin trim.
Although you can't see it, I glittered the entire cap of this bottle.
This tag was one of two original tags I was working on when I wanted to make the potion bottle labels. I just coudln't get it to look like I wanted it to so igave up and kept it as a tag. I made it with the brushes from Rhonna's Spooky Junque. The kit includes png files as well if you aren't into Photoshop. I added glitter, rubber stamps, ink…
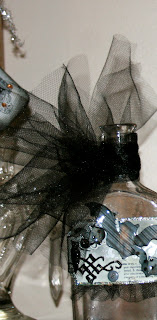
This tag started as a House of 3 tag I had from last year. I added the bat die cuts (Sizzix Bats) that I inked (I used Black Distress on EVERYTHING I made) and covered with Glossy Accents. I waited until the glossy had dried a little and started shaping the wings so they would be more 3D. I glittered the edges and details and added tiny buttons. There is gathered black tulle running along the bottom of the tag.
I tied a big bow with several loops around the neck and then cut the loops open and fluffed.
I tied a big bow with several loops around the neck and then cut the loops open and fluffed.
I ADORE this bottle and it was the most thrown together. I added a pre-made pearl swirl from Prima, a glittered "magic" tag, ribbon, and a simple but beautiful flower I made with black crepe paper (the kind you get for kids birthday parties) that I edged it with glue (by drawing a Martha Stewart glue pen across the edge) and glittered silver. I cut a small length and hand stitched a running stitch along the bottom which I then gathered and tied off. A vintage bead in the middle and Wala! A beautiful, simple, flower. In the picture to the right you can see I also added a swig of the branch I used on some pumpkins.
This isn't a vintage bottle but I loved the simplicity of it. I made the tag again with the png from Rhonna. This time I added some orange ink ver the flowers. I just used a piece of sponge and sort of swirled it one. I wanted some color but not dark or perfect. I added more silver glitter circles I cut with a punch and a flower I made with tulle cut in circles freehand and stacked off center. I put a sparkly orange brad in the center and started pulling and twisting the tulle.
Two quick pictures of a wreath I made for my mom from a Martha Stewart Kit. Super easy and I love the way it looks.
Laters


I really do enjoy your Halloween decorations. Lots of fun.
ReplyDeletePopped over from Polish the Stars and I just love your creations! Happy Halloween!
ReplyDelete