Saturday, June 22, 2013

Wedding: Chalkboard Tutorial


You can read all about the previous wedding projects wedding, more decor, and the altar

As we were brainstorming about what Brandin wanted for the vibe of her wedding and how to present the menus we decided to go with chalkboards.  The best part of this idea is that she has a friend who is a chalkboard artists so all I had to do was make the actual boards.  As you can see her friend did a great job with her part of the project. 

FYI: The entire wedding was a local food lovers delight.  AZO is a local wine (AZO is also the airport in Kalamazoo).

 Crane's is a local Fennville orchard and restaurant.  Their pies, cobbler, and cider are amazing.
Palazzolo's is a local Fennville, gelato manufacturer who make the BEST gelato.  I  know this because I eat it all the time-thankfully my local grocery store carries it. 

Before we get to the tutorial,  I want to talk about Annie Sloan Chalk Paint and Chalkboard Paint.  They are NOT the same thing.  Annie Sloan Chalk Paint is a fabulous paint that goes on easily without having to prep or prime the wood.  It leaves an amazing finish and with the appropriate waxes you can develop a beautiful patina.  It is perfect for restoring or repurposing old or ugly furniture.  The Annie Sloan website has a lot of great information and videos.   

If you have read any home dec blogs in the last few years I am sure you have come across this amazing paint and now I can see why it is so popular.  I loved working with this paint and I love the end result.  I used a can that Brandin had leftover from another project soI didn't choose the color.  I hear from a friend who uses it a lot that the Old Ochre is THE color.  The paint comes in 32 colors but there are recipes on their website to make other colors.  I am planning on several projects this summer and I promise I will be using this brand of paint on all of them. 

While I am hooked, there are two major downsides to Annie Sloan Chalk Paint: 1) it is hard to find and 2) it is not cheap.  The paint is only carried in a few stores; in Michigan that means there are a total of seven stores and I couldn't find a legitimate online retailer.  I may be wrong on that front- I did find Ebay sellers offering it.  You can check the website to find a store "near" you.  The expense is often discussed on the blogs.  I feel like it is worth it because it is so easy to use and leave such a nice patina,  however I also understand that not everyone can spend around $36 for a quart of paint.  The high price of the paint has brought out the recipes for the faux.  Want to know more? Hit up Pinterest and you will find a lot of mentions.  My feeling? You get what you pay for.  

Chalkboard paint is the paint that produces a chalkboard surface for writing on with chalk- a very different product.  Do NOT confuse the two...you will have a hot mess.  Chalkboard paint comes in a can or spray can.  It is easy to work with- be sure to mix the paint well and season the board by rubbing a piece of chalk-turned on its side- across the board to completely cover it in chalk, erase and you are ready to make beautiful chalk art- or let your kids play school.  

Chalkboard Tutorial
To make your own chalkboard you will need:
Frames- I used some basic frames that came just as you see them pictured below- no glass, no backers.     
       I got them at Michael's for less than $15 each.
Annie Sloan White Chalk Paint
Annie Sloan Clear Soft Wax
Colored Wax-I used a deep brown furniture wax
Paint brush
Old Towels 
3/16  Black Chalk Board- this is an MDF product that comes ready to go and is about $10/sheet at 
       Home Depot
Glazing Points 
As I mentioned- there is no prep for the Chalk Paint.  Love that there is no sanding, no priming- it makes the impatient part of me very happy.  
Look how well 1 coat covers the dark wood.  I do believe that good brushes are a must and Annie Sloan has a line of brushes.  If I do any more projects I will invest in their brushes. 
I gave each frame 2 coats just to be sure.
After the paint was throughly dry it is time to apply the wax.  Annie Sloan has a line of waxes.  The first thing to do is apply the soft clear wax.  Again there are brushes made for this- I didn't have them so I used a terry cloth towel- not the best but it worked for this small project.  I will get the proper brushes for future projects. 
After the clear wax dried and was buffed.
After the soft clear wax dries it is time to age the piece by sing a dark brown wax.  Again I didn't have the Annie Sloan version but did have an OLD can of a dark brown furniture wax.  I used what I had on hand and again applied with terry cloth towel.  When it was dry I buffed it using a clean side of the same towel. 
After I added the brown wax.
I will admit that in hindsight I was too heavy handed with the dark wax. You will see in tomorrow's post about another chalkboard (made using a big mirror) I used a lighter touch and it looks better. 

Here is a "before and after".   I love the way it turned out.  But it isn't a chalkboard yet...
 3/16 x 2 x 4 MDF Black Chalk Board
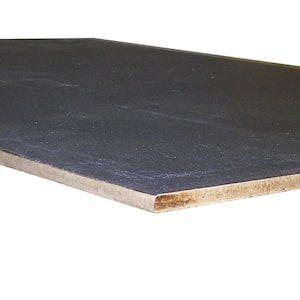
3/16 MDF Black Chalk Board from Home Depot

I sent my husband to Home Depot to get something I could paint with chalkboard paint-I was thinking MDF or a smooth plywood product.  He came back with this time saver- 3/16 MDF Black Chalk Board.  It comes in sheets- for $9 which was big enough to do all 3 larger boards.  Home Depot even cut it for us. The smaller frame (shown in the Before and After photo) didn't actually make it's way into being a full-fledged  chalkboard because Home Depot didn't cut the sheet accurately and it was just short of fitting in the frame.  The Board was held in place using glazing points.   We propped the chalkboards up on various items but you could easily add picture frame wire and eye hooks to the back of each frame and hang them up or use easels.  
Tomorrow: How to Repurpose a OLD UGLY Mirror into an Awesome Chalkboard
This post was linked to the following Linky Parties:
I Gotta Try That
The 36th Avenue
Bloom Designs
30 Handmade Days

Thursday, June 20, 2013

Wedding: Altar

Yesterday and Tuesday, I posted the photos from inside the barn; today I am sharing the ceremony space.  The barn is on a hill and there wasn't a lot of flat space for laying out an aisle and altar.  Because we used folding chairs, it was very important that the area be relatively flat.  I kept having visions of grandma caught up in a folding chair that had only 3 legs on the earth before it folded up, swallowing her up in it.  Thankfully that didn't happen.
As I said over and over- ad nauseam -last week "It's a barn wedding, held outside".  While you might be surprised by the wide variety of questions to which that answer fit, right now the question is "what shoes should I wear?".  It's a barn wedding, held outside.... in this case that means rough terrain and potholes- in both the barn and on the lawn.  Remember, this is a real barn on a real working farm.  Even though this barn isn't home to neither tractors nor horses, it isn't a faux-barn wedding venue either.  The floor of the barn had holes- lots of holes....a few big enough for a small foot to go through- though thankfully that didn't happen.  Outside on the lawn...well let's just say nobody replaced the divots after the last polo match :D.

If you have dreams of a vintage barn wedding be sure to warn all the guests to wear appropriate shoes.  While most men would probably already wear shoes that fit this category...only you know your guest list and you might have one male fashionista who needs a warning.  For the most part this means the women need to be warned to choose attire that will go with flats or wedge heels.  I'm sure there are any number of elaborate ways of passing this message around; Brandin just went with word-of-mouth to notify her guests and it worked pretty well.
Thankfully, the wedding party walked gracefully toward the altar with not a single stumble or babble.  Ah, but there was some road kill.  Who you ask?  Me...ok...yes, it was me....  I'm the only idiot that managed to fall and it was epic.  So epic that I pulled the muscle in my back...it was that spectacular.  I think the problem was that I tried not to fall...you know, because there were people everywhere....ok in all honestly, there were only two people at the barn that early and one of them was me, but still....there was an audience, a crowd a person who was watching and I didn't want to embarrass myself.  Soooo, instead I stumbled, arms flailing and legs going in all directions, for like 18 minutes before finally succumbing to gravity and hitting the dirt.  E.P.I.C.ally embarrassing... moving on....

Most weddings will have a few elderly guests and maybe a wheelchair bound guests as well.  We used a golf cart to get the these guests up to the ceremony space.  If you are considering an outdoor wedding with anything that could even remotely be called "rough terrain" you really need some form of transportation for those guests who need assistance.

What to do for the altar was a long-k issue for us.  Brandin had found an altar that she really loved and she kept going back to it.

She loved the drape as well as the floral tie-backs.  Originally, the plan was that someone would build something.  But that didn't happen.  I get that, people are busy with real life.  We looked at Craig's list and even at rentals, but nothing made Brandin happy.  

Now, I must say Brandin isn't a high-strung girl, in fact, she's pretty chill.  But Tuesday, May 28, 2013 the girl lost it.  She was freaking out-not yelling or being rude-no, she was just worried, anxious and 
having trouble focusing.  She has been over to my house helping work on a few projects but after she got home I received this text. 

 What I found amusing was "don't laugh".   The drawing was the one you see below.  
I'm not laughing...I think it is a good idea actually.  So we use the rustic windmill...I like it....we use fabric (we had a ton) so she gets her drape...I like it...and we use the ball jars that tie it into the decor in the barn...I like it.  Nothing to laugh at.  However,  I still felt we were missing something so as the date of the wedding drew nearer, I spent one evening looking at rustic/vintage barn weddings to get ideas for the altar.  I found a lot of cool looking spaces using old doors.  Old doors we have...by the oodles.  The barn was full of old doors.   I think we can make this work. Don't forget you can check my Pinterest or more specifically the "Wedding" board for all sorts of ideas and find what we used for inspiration. 
In the end I think the altar turned out really awesome.  The old door was in the barn and just needed a thorough cleaning to be perfect.  
The Burlap curtains are Brandin's sister's and are actual curtains.  We simple ran a length of twine through the top and tied it off around the windmill.  The tulle was actually left over from the walls inside the barn.  The tulle was 8'x8' and was gathered with a quick gathering stitch on my sewing machine.  FYI:  I did all the cutting and sewing at the barn because tulle wrinkles easily and once it is wrinkled it is hard-to-impossible to get them out.  I used a rotary cutter and self-healing mat to do all the cutting.  For the altar the tulle was gathered tight at the top and actually tied right to the twine that holds the burlap curtains.  I tucked the tulle inside the curtain so that it looked more like a lining. The curtain and the tulle were tied back with twine and once the florist delivered the flowers, they were wired into place. 
We put the door, the curtains, and the chairs in place the night before the wedding and then spent all night praying it didn't rain.
This was taken the day before- notice the beautiful weather. 
Ideally, I would have done it all the morning of but my husband couldn't help me and I was by myself- no way I was carrying the door and climbing the windmill.  Thankfully, it didn't rain until later.
My friend gave me some old wire that he had from taking down a fence- great because it was rustic.  My husband wrapped it around the mason jars and adding a hook at the top.  He gave each one a little twist and twirl that really added a lot of character.  I hung the jars the morning of the ceremony, catching the hook on the metal of the windmill.  We had candles in them but since it was raining I didn't bother to light them.  My final embellishment was adding the poms that looked like flowers.  I used fringing sheers to make a pretty center for each of the smaller poms- made using half sheet of tissue.
To the left of the windmill we raised a gazebo.  Why you ask?  Because the harp can't be in the sun...duh.  I didn't know that either, but Farmer John told us we needed some sort of shade.   Because the gazebo was not attractive at a wedding level, I added a row of the pom flowers across the front to help beautify it.  Come on, I'm not a miracle worker....
The florist did a beautiful job with the buckets of flowers that hung from shepherd's hooks.  I love that she removed the metal handles and replaced them with a length of satin ribbon simply tied in place.  
Time to get married......
The harp all safe in it's gazebo.  No sun that day, but I'm sure the rain wouldn't have done much good either.  

A very pretty ceremony.

This post was linked to the following Linky Parties:
Bloom
I Gotta Try That
The 36th Avenue
Inspiration Exchange
30 Handmade Days 
Thursdays Favorite Things
Live Laugh Rowe

Wednesday, June 19, 2013

Wedding: More photos of the Wedding Day

My mom read my post from yesterday and promptly informed me she had photos for most of things I was missing.  After spending 6 hours helping her email them to me (explaining and re-explaining), I now have them in my hot little hands.  So without further ado.....(oh, and it really didn't take 6 hours...more like 1 hour and 45 text messages).
This was such a fun and whimsical space.  Behind all the curtains and doors (and windows) is the space the catering staff was using.  This corner has a great mix of texture and color; vintage with new.
A quick shot of the hidden space.  I was so impressed with how efficient the catering staff was in a space that was not meant for food prep.  They had to bring water- both to serve and as a hand-washing and dish-washing stations.  They kept everything well organized and frankly you could have picked them up and put them in a posh hotel space and other than their attire being a tad informal they would have fit right in.  Definitely a top notch job-both food and service- by Salt Of The Earth.
This is the charcuterie that Salt Of The Earth served right after the ceremony.  It was both visually STUNNING and mouth-wateringly delicious.  This table- which belongs to the barn- couldn't have been a more perfect setting for the charcuterie.  Curious about what foods were included in this charcuterie?  It's all on the chalkboard below.
All the components were amazing, but the bread...oh the bread...my husband and I are complete bread snobs.  Sadly, we live in an area with crappy bread so it was such a treat to eat bread as it should be- crunchy crust with meaty inside...hmmmmmmm.... It is probably worth a trip over to Fennville just to stock up on bread. 
I didn't have a photo of the tables AFTER the place settings were completed...now I do.  Isn't it all so pretty? I LOVE the teal napkins against the burlap runners and white tablecloths and the blue bell jars and the pastel flowers.  It just all fits the vintage theme Brandin wanted.
This is right after the wedding as the catering staff was bringing in the chairs (we used the same chairs for the ceremony and reception) and my daughter and I, as well as the staff, ran around and dried them off.  The rain had really picked up right as the ceremony ended.

All week we had beautiful weather but it's Michigan and one takes a risk with an outdoor wedding. Someone told me that it is good luck to have rain on one's wedding day....of course I was told this when it started raining on MY wedding day (thankfully, it was at the very end of the day).  I'd like to believe the sentiment is true and I'm still happily married 19 years later.  Saturday, it started to drizzle around 10am but then it stopped.  Our rain plan wasn't a great one- it involved everyone sitting at the tables in the barn and the bride and groom standing at one end.  There would be.no aisle to walk down and the space wasn't decorated appropriately for the ceremoney.  The ceremony was scheduled for 12:30 so we kept praying to Mother Nature (sorta of like "Please Mother....Please hold off the rain....") Hmmmm maybe I should have had the kids to an "anti-rain dance"?  Anyway, she didn't listen and it started raining again about 12:15 with radar showing more rain coming.  I asked Brandin what she wanted to do and she calmly asked me if everyone was sitting in the seats (the seats outside) .  I told her "yes" to which she said "well I will go out there in the rain" ok, let's go".  What a trooper...no Bridzilla's at this wedding!  Someone gave her dad an umbrella to hold while she walked down the aisle but then she just stood in the rain with the rest of us.  It was drizzling through most of the ceremony and didn't  really start raining hard until right at the end of the ceremony.  Everyone headed into the barn and it was all good.   I will post ceremony photos tomorrow.
Right after the ceremony Bill and Brandin signed their marriage license while the maid of honor sits in the background.  You can see from these photos that nobody looks like they stood in the rain for 20 minutes.  ***During the reception I learned that the maid of honor and I share a birthday...that means I expect at least a card, Brandin.  
This photo is blurry, but you can see that Brandin looked divine.  Her hair and makeup were gorgeous, her dress is beautiful, and the attendants looked amazing.  Brandin works at a salon and her fellow stylists did all the hair and makeup. Her friend made the headpiece and I embellished the sash (I will have tutorial for that later).  Brandin was a very pretty, very relaxed, and very HAPPY bride.  She sat back and enjoyed the day with her man- letting me and Casey (and his catering staff) handle all the little problems that are inevitable at such an event.  Weddings are about celebrating the love between two people; a love that will create a new family.  Weddings aren't about checking off squares on a preprinted listed one found in Bride's magazine.... 
  • reception line (check)  
  • toast (check)
  • first dance (check)
  • father-daugther dance (check)
  • walk around and speak to everyone- while they try to eat (and you end up not eating anything).  In order to reach everyone you can spend 1.3 seconds per person...go (check)
  • garter (check)
  • throw bouquet (check)
You get the idea.  The wedding industry is a ridiculous juggernaut of do's and don'ts that are ridiculous.  Couples need to tailor the wedding to their style.  Brandin and Bill had pie and ice cream sundaes- not cake, they skipped the reception line altogether, and nobody tossed a bouquet or a garter belt.  They did do the first dance and father/daughter dance but then they sat down- they aren't big dancers.  There was a small dance floor for the guests who wanted to dance but there were no chickens dancing, no Macarenas shaking or gundam styling.  I wish all brides and grooms would realize that it is their day to celebrate their love and therefore it should be all about them.  I've been to enough weddings to observe that if the couple is happy and relaxed then every one of their guests will be as well.