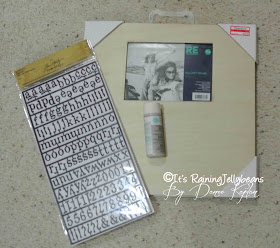
I actually had the idea for this project back when I was working on Brandin's wedding but I had too many projects going and I never got around to making it. When my friends celebrated their 50th Wedding Anniversary in early August-and requested "no gifts"-I knew this was perfect opportunity to make the frame. Yes, it is a gift, but it is a small gift- so it fit the bill....er...close enough.
I started with a frame I got on clearance at Target. ***ProTip (this is the word my 8-year-old tells me when he gives me video game advice). ProTip: Target sale stickers have a tiny number in the upper right hand corner. That number is the percentage off. You will find a lot of 15's in that corner. I like to wait around to see at least a 50 there.SUPPLIES:
- Frame: Look for a frame with a wide flat portion to hold your letters.
- Letters: You can use several different products here- I first planned on using the Idea-ology Alpha Parts but ended up using the letters from Idea-ology Grunge Blocks.
- Ruler- I prefer Tim's Idea-ology Tonic Design Ruler (I love you Tim, but that name is Ridic).
- Glue- I used Glossy Accents because it dries quickly and works on multiple surfaces. Gel Medium would work as well.
- Paint- I used a grey/stone color. In hindsight....I shoulda picked a different color.
- Foam Brush
- Washi Tape or blue painters tape, something low tack
 |
| Idea-ology Grunge Blocks |
2. Get the letters out. The Grunge Blocks are a mishmash of fonts and sizes so I played around and varied the shapes and sizes until I like what I had. Instead of Grunge Block letters, you could use white letter stickers, Alpha Parts, chipboard letters, or letters cut from cardstock using a die cut machine. Just be sure the letters can be painted over so. I want the words to blend in with the background. If you want your words to stand out, then be sure to put them on AFTER you paint the frame.
3. Loosely lay out the letters until you like the way they look. I decided my design needed 3 rows.
5. Use the lower edge of the tape as a guide for placing the letters down.
6. Using the ruler to add a second row of tape below the first one.
7. And finally a 3rd row.
8. I laid the words out to see if I still liked the layout before any glue came into the area.
9. Because the letters I used had to be punched off a backing sheet, there is an occasional blip? bump? hanging chad? Whatever they are called, one cannot ignore these atrocities... so get rid of them. Scissors, sand paper (cheap nails files are easy to have on hand), or an Xacto blade can help you in this mission.
10. Once the letters have all been under the knife, it is time to get the glue. I pulled the the back so that one letter at a time could be glued in place. This allowed me to keep the straight line as a reference.
11. Gluing is always tricky. While it may dry clear, it will show once you paint the surface. So be careful and take your time and avoid the glue spooge.
12. I used a sophisticated weight system to keep the ltters flat and in place while the glue bonded. A spray bottle full of water did the trick.
13. I let the glue dry overnight- although Glossy Accents dries much faster than that, I didn't want to have any issues with excess moisture.
14. I painted the frame with 2 coats of Martha Stewart Paint. I didn't need to prep the surface of the frame but if yours has a thick sealant or is very shiny you should use a fine sand paper to scuff up the surface before you add the paint. You do have to be careful to get paint around all the letters while keeping it from pooling in the tiny spaces. Take your time.
15. This is after 1 coat of paint. I must find the photo of the completed project. It looked just like this but the paint was even...visualize that now. Thank you.
Oh look, I found it...
I hope you day is filled with Sunshine and GLITTER
Danee


I like this idea - a great personalized gift that can fit any occasion.
ReplyDelete