Pages

Sunday, June 30, 2013

12 Tags of 2013: June Edition

Ok, so it will only be June for a few more hours but hey, I made the cut.  Tim Holtz's June 12 Tags of 2013 tag is all about Distress Markers and mixing Distress products and water.  I will admit I have not been a really big marker fan-a-tic. I know that it's just about heresy now days to say that with the Copic Markers sweeping the land.  I've just never been a big fan of the look of coloring in a stamped image.  That is until during the dwindling hours of June 2013 when I sat down to replicate Tim's tag using a stamp I actually had, a few markers that I purchased when I took Tim's Creative Chemistry class, and water.  I...Am....Hooked.

I cannot really express enough how much I love this look.   I made 8 tags, all slightly different. What changed me?  I think it's the WATER.  The effect that water has on the Distress Markers leads to a great water-color effect that I just love.  Let start at the very beginning....a very good place to start....when you sing you begin with do, re...oh right.   First let me show you Tim's tag.
Source: Tim Holtz
Gorgeous right? As you know if Tim is teaching something I haven't done before, I like to make at least one version as close to Tim's as possible so that I  can really learn the technique rather than worry about what substitutes what.  Then I like to add my own spin on it-hence the 8 tags.  Want to make one yourself?  You can see Tim's tutorial with step-out photos here.

Now me.  Here is my first take using close to the same products and images.
Made using a #12 Manilla Tag
The trick is to stamp the image on to watercolor paper using Archival Ink and heat setting it a second.  Then using the Distress Markers to lay down some color before using a Ranger Water Brush to drag the color around giving it a water color look.  LOVE IT...but we aren't done and this is where I got excited.
After the main coloring is done it is time to add the 3 new techniques that really add to the interest and texture of the piece.  
  1. Drop shadows were added- Tim uses a Pumice Stone Distress Marker-which I don't have at the moment.  I used the only color I had that was even remotely close and that was Rubbed Sage.  I think it worked ok.  I
  2. I distressed the edges of the watercolor paper with Vintage Photo Distress Ink using a Blending Tool.  Here is where it gets interesting.  I dragged the color toward the center of the paper using the Water Brush.  All the areas that are still white take on a cool, aged patina. 
  3. Finally I added tiny droplets of color splattered all over the stamped image.  So fun and they add so much interest. 
Don't forget, you can read Tim's blog to learn how to do these new techniques yourself.

Oh, but we aren't done with the cool and fun new techniques.  The rules for coloring backgrounds has changed forever...at least in my studio it has.  I have not been quiet about my love for Tim's new Distress Paints.  I LOVE the way they look on backgrounds...I LOVE the way they mix with water while they are wet but become impervious when dry....and I LOVE the vivid, opaque colors.  But now I have something I LOVE even more.  That's right folks, we mixed Distress Ink, Distress Stain and Distress Paint to make the best backgrounds E.V.E.R.
All 3 mediums mix with water which allows the wet colors to swirl and blend together.  The contrast between the sheer Stain and Ink mixed with the opaque Paint is just eye candy.  I will admit that I haven't figured out how to get backgrounds as gorgeous as Tim's- mine always get a little muddier than I like and I can't help but wonder if that man ZAPS his colors up in Photoshop because they are always so vivid on his blog.   Anyway, part of the fun of this technique is seeing what you get.  The game goes like this:  lay down 3 mediums in 3 colors, add the magic ingredient...WATER...drag the tag through it all, flip it over and VOILA....everybody wins because the result is always fun.

This is my second tag.  Again I used a #12 tag which left me a little room for a fun little book paper ruffle and more of the gorgeous background is visible.
Now that I buttered you up with how pretty the backgrounds can be I will show you my favorite background from among the DragonFly tags.  If the purple/pink dragon fly was a little prettier it would be the perfect tag.  Eh, what can I saw?  Say "You should have made another dragonfly before you used Glossy Accents to PERMANETLY affix the watercolor paper to the tag...dummy".

 You can really see the opaque and sheer colors swirling together on this #10 tag
My final DragonFly version of the June Tag-I love how vibrant the colors are on this green piece (No not Green PEACE...Green PIECE).  
Coming up: I will show you a really cute take off of this tag with shoes and  a wedding card version.  Wedding?  Who said Wedding? 

Have a day filled with Sunshine and Glitter....

This post was linked the following Linky Parties:
I Gotta Try That- Where I was featured for my post on Altars!

Wedding: CARD Suitcase

Using a vintage suitcase to hold the gift cards was a decision that Brandin made before I was on involved but I love the idea.  The biggest drawback-and it has to be said-is that it leaves the card in plain-tempting- site, possibly tempting someone to make a withdrawal when no one is looking. Of course it is sobering to think someone would steal from you at your own wedding but the reality is people do.  We solved this simply by emptying the suitcase as it filled up and stashing the cards in a safe location.  Be sure to assign this to someone you trust implicitly and who isn't in the wedding party-they will be too busy to adequately keep watch.

Making a suitcase into a card "holder" is pretty simple.  
Brandin purchased this vintage suitcase from a mutual friend who has an amazing little booth of vintage goods in a local consignment shop. 
 Like all vintage suitcases it smelled musty, icky and had a few issues that needed to be attended to.
The leather trim was loose in some places and falling apart in one corner. I carefully applied Fabri-Tac fabric glue to all the loose areas and held the trim it in place for a few minutes until it held.  This was a very easy fix.

****Excuse the Dark Shadow you see in this photo. This was happening at about 5am-roughly 12 hours into my wedding projects that day.  I think around 2am or so my give-a-s*#t level tanked.  All those perfect tutorial-ready photos....yeah, WhatEVER.  Staging became just-get-the-shot-and-MOVE-on.  My basement studio is amazing, really it is...it is full of overhead lighting..as in "it provides a lot of great OVERHEAD light".  The downside? It provides a LOT of OVERHEAD light.
The leather trim looks much better after it was glued in place.

As is typical of a lot of vintage the luggage the inside is icky. I did take the suitcase outside and brush all the loose dirt out after I took these photos...remember the *** above?  Yeah, I was TIRED when I shot these photos.
I was worried that the ugly interior would be an unnecessary distraction at the wedding.  Nobody wants to see this ugly mess.  I needed to beautify the lining. Now, if this suitcase was going to be permanently on display with the lining showing, I would do something more detailed and pretty.  But for our purposes, it would only be on display for a few hours, my solution was simple and two-fold.
The musty oder inside was also a big turn off.  I contemplated several solutions-kitty litter, crumpled newspaper, oder-removing prodents- but in the end, I decided to start with the easiest and cheapest....Mr. Sun, Sun Mr. Golden Sun.  I let the opened suitcase sit in the sun for a full day. It worked well enough for our purposes.  Then it was time to do my favorite part....dress it up!
I made a simple garland using #10 manilla shipping tags, chipboard letters, vintage lace and seam binding.  I misted the tags using Heidi Swapp's Color Shine in Mustard and Georgia Peach.  I stamped randomly using Pretty Peony stamp by Impression Obsession using Archival Ink in Sienna.  Finally, I inked the edges using Vintage Photo Distress Ink and an ink blending tool.   The letters C,A,R, and D came from a set of chipboard letters I've been hoarding for ages... I have no idea who made them.  I colored them using Tarnished Brass Distress Paint.  It really gave it a vintage look and covered the chipboard well in two coats.  I used hot glue to attach lace to the back of each tag as well as the dried chipboards letters.  Finally I ran a length of the seam binding through each hole and tied it once so the tags wouldn't slide along the ribbon.  The ends of the seam binding were lefty 6-8 inches long and were attached tot the suitcase using large Zots glue dots.  I didn't want to use anything that would damage the suitcase.  I tied two separate bows, using the same color seam biding.  The bows were used to cover the area where the seam binding was attached to the suitcase and add a pretty detail. I used more glue dots to attach the bows.
 The bottom of the suitcase was covered with a square of the darker peach, sheer fabric.  That was layered with a pretty lace overlay that I cut from an old lace tablecloth.
That is it....easy, vintage, and romantic.  I think it looks much better than the wedding card boxes I see for sale.

Have a day filled with Sunshine and Glitter....
This post was linked to the following Linky Parties:
Classy Clutter

Tuesday, June 25, 2013

Wedding: Wreaths with Tutorial

Providing ALL of the decor for Brandin's wedding was a daunting task.  This is not something I had any experience in.  Keep in mind that the only other wedding I had done was my own, 19 years ago. Yes, I did a lot of stuff for my wedding and I promise I will blog about it soon.  I have to scan all the documents and photos into my computer cuz it was pre-internet, pre-Pinterest, pre-digital photos people.  Anyway, I was not responsible for the decor.  We were married at a bed and breakfast so the decor was taken care of by the venue, I just added my flair with a few projects.

When Brandin first asked for help with her wedding, it was really more of a "help me trim down this plethora of ideas into something cohesive".  You know me, I don't know when to say when and this wedding was right up my alley from the beginning so it quickly became and "I can make that..." kind of thing until I was making EVERYTHING.  Sometime around March 1st I started to panic.  For one thing I wasn't feeling well (thankfully that seems to have resolved) but the biggest fear was the sheer size of the space I had to fill and the logistics of the space- no electricity until day of the wedding, no water, and it was hour from my house.  I was never worried about the individual projects- I've been creative and crafty my entire life, so I knew that I could make things that looked great and would fit the "vintage barn wedding". What I didn't know was how much stuff would it take to decorate a big barn or how the table centerpieces would look on the exact tables-was the proportion correct?  You know, the sort of stuff that a seasoned event planner would know... but I just didn't.  Since I had a big ol' barn to decorate and I was nervous, I went with bigger is better and a more is better attitude.  I made a lot of stuff without a set plan of where it would end up exactly or specifically how many we would need.   The 3 wreathes you see here were definitely included in this group.
Wreath 1: Dried Hydrangea with Gold
Brandin had seen a pretty table runner that used dried hydrangeas; she loved it and wanted to incorporate the flower somehow into her wedding decor.  Problem #1: It was late winter...in Michigan.  Not a time to source dried hydrangeas.   Problem #2: The brown, dried flowers didn't exactly go with the fresh pastel peonies that were to be the prominent flower in the wedding.  A friend gave her a bag full of brown dried-hydrangeas so the challenge was on!
I never let a challenge beat me.  I had purchased the 3 grapevine wreaths while at Michael's one day because they were marked down and I had a 15% everything coupon.  A crafter can always use grapevine wreaths.  I stumbled over the bag of hydrangeas for weeks without a real sense of what I was going to do with them.  One day I just decided to bite the bullet, grabbed the bag, my hot glue gun and a wreath. 
The hydrangeas were so dry they were very fragile so I had to be very careful.  I ended up cutting them apart at the stems using sharp scissors giving me small pieces I could hot glue to the wreath base.  Definitely be gentle when using something this dry.  I worked my way around the wreath being sure to keep the shape symmetrical and full.  When I had covered roughly half of the wreath I decided I had enough- I wanted the texture differences between the grapevine and the hydrangeas to show.  This is pure preference- if you wanted to cover the grapevine entirely that would be beautiful as well.

Seam binding is gorgeous but it isn't great for making big puffy bows.  It is just too limp.  So I solved that problem by making lots of smaller bows and hot gluing them next to each other to appear as one largerbow. I wrapped the seam biding around my fingers 3 or 4 times and used a 5 inch length of the same ribbon to tie it right at the middle.  This was hot glued into place.

It still needed something....gold?...glitter?  I tried to glitter the dried hydrangeas (I used a small blossom I had left over) and it was a hot mess.  They were too fragile to really brush the glue on so it make a big nasty ugly mess.  I considered gold bows... gold ornaments... but nothing seemed to fit the vibe of the wedding until I happened to notice my Martha Stewart Hydrangea Punch.  Glittered single petal hydrangea blossoms? Perfect.

Tutorial:
Martha Stewart Hydrangea Punch
Martha Stewart Drill Punch
Small Flower Stamens (available in floral department of craft stores)
Glitter Paper
Hot Glue
Scissors
 Begin by punching the flower petals from the glitter paper.
The stamens come double sided so I simply clipped the middle giving me a twice as many stamens.
For this project the stem was long enough however you could always clip right up close to one end and discard the stemless stamen leaving you with a stamen on a longer stem.
You need to punch a small home in the center of hte petal. I used the smallest size punch with my Martha Stewart Drill Punch.  Be sure to do this on a self-healing mat or as I did on a cutting board.
 Thread the stamen into the petal and place a small dab of hot glue on the back right where they join.
It should look like this.
 I made a bunch and let them cool off for a few minutes.
I adore the way the look.  I simply glued them randomly all over the dried hydrangeas being very careful not to break any of the blossoms.  They are hard to see in the photograph. If you zoom in really close you can see them but in person, they added just enough sparkle to be wedding appropriate yet still had the vintage vibe I was going for.

Wreath 2: Burlap Roses and Peonies 
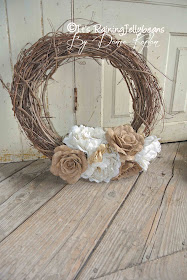
This wreath was a complete fluke.  I went to Hobby Lobby looking for burlap ribbon and few other items for the wedding and happened to find a bunch of burlap flowers, including burlap roses and peonies.  I shot a photo, sent it to Brandin and received the "get them" answer I expected.  Again, we were using pretty pastel flowers for the wedding and I didn't want to take away from that with a bug burlap arrangement-and they weren't cheap- so I went with a wreath.  The other nice thing about wreaths is Brandin and Bill can use them in their home for years- a great home decor item as well as wedding memory. 

I have wreath tutorials you can find part 1 here and part 2 here.  You can also see my Pinterest Wreath Board for lots of ideas.  The Part 2 tutorial shows how to get the blossoms off the stems without everything falling apart.  Basically, hot glue is your friend.  Once you pull the flower off the stem be sure to immediately add a large glob of hot glue into the space to hold the plastic piece together.  I hot glued the flowers on to the wreath close to each other and added a few off-white seam binding bows- Simple.

Wreath 3: Roses, Burlap and Book Paper
This final wreath is my favorite one of the three.  Brandin gave me the 4 roses because she purchased them and didn't need them.  If you have ever tried you know that Hobby Lobby is a nightmare to make a return.  It is less stressful to just find a use for whatever you bought.  As the wedding was getting closer I had only the 2 wreaths and I wanted a third so I grabbed the roses and  glued them in place...I had some left over burlap ribbon so I made a big bow.   Hmmm....what else?  I freehand-cut some leaves from the burlap ribbon and glued them in place.  Finally I added some freehand-cut book paper leaves. Perfect.  Only after I made the thing and photographed it did I noticed the cool branch running across the inside of the wreath.  So cool.
Although this isn't the finished space you can see that we hung the wreaths along this "wall" along with the photos. The finished space had the gift table (the wooden table in the forefront) as well as the drink tables (the plastic tables in the back) and the dessert area.
This post was linked to the following Linky Parties:

Wedding: Embellished Sash


Embellished Bridal Sash
Brandin wanted a flower sash for her dress.  She gave me the store-bought sash and a length of double satin ribbon.  She needed the flower portion removed from the elastic band/snap belt and attached to the ribbon so her seamstress could attach the sash to the dress.  The back of her wedding dress was corseted so the ribbon needed to be attached to the side seams, leaving the corset untouched.  

The flower section -as you see above- is made up of 3 fabric flowers attached to a faux leather background.  I broke the stitching along the edges of the faux leather which allowed me to slip the elastic bands out - I threw them away.  I tried to sew the ribbon in place exactly like the elastic belt was  but my machine kept catching the ribbon and fraying it.  In the end I used Fabri-Tac fabric glue to glue the two pieces together.  It worked beautifully and as you can see below the result looks like it came that way. 
You can see here how the ribbon and the flower section are attached.
You didn't think I let it go that easy did you?  You know that I couldn't just leave it alone....it needed embellishing.  I didn't think it was dressy enough for a wedding.  First, I tried adding pearls but the way the flowers were designed I couldn't get it to look the way I wanted it to.  I considered adding hot fix rhinestones but if I didn't like the result I had no way of replacing the sash.  
One day while Brandin was over working on the silk-screened votives (tutorial to come) I decided to try adding flowers to the sash. I used Tim Hotz's Tattered Florals die and my Vagabond to cut petals from a shimmery organza I had laying around and the pink crepe fabric that Brandin had originally bought for the bridesmaid's skirts.  The skirts didn't look like she wanted so she went in another direction.  That left a ton of fabric for me to use and you will see it show up in other wedding projects.  

 I snipped a tiny hole in the center of each petal and added tiny white stamens to each little flower.  The stamens are double ended so I simply folded them over and used 2 or 3 sets (of 2) per flower (ending with 4-6 white bulb-shaped stamens per flower).  I shaped the flowers using a needle and thread by simply taking random, tiny stitches near the stamen (center) of each flower and gathering a little here and there as I went.  This is all a judgement call and not a rigid, specific instruction.  When I was happy with each flower I used white floral tape to hold the stamen and flower together.  The stamen-stem (covered in white floral tape) was trimmed off and the flowers were attached to the sash with judicious and careful use of Fabri-Tac fabric glue.  Fabri-Tac can be difficult to work with and it will leave a watermark/oily stain if you get it on the  front of the fabric or use too much and it seeps through to the front.  So be careful and use as little as possible.  "Just a dab will do ya" definitely applies here. 

  I love the way the newly embellished sash looked on the dress.   

I realize I didn't take step-out photos of the flowers, if you are interested in a photo tutorial for this project let me know by leaving a comment here or shooting me an email.

This post was linked the following Linky Parties:
I Gotta Try That

Monday, June 24, 2013

Wedding: Chalkboard #2 Tutorial

I made another chalkboard.  This time we really used our ingenuity and repurposed an old mirror that Brandin had lying around. It was ugly- I'm just saying- and she hated it so much she intended it sell it in their yard sale.  Sad, because it is huge and huge mirrors are expensive.  I got my crafty hands on it and now it is a thing of beauty.
We made 3 "large" chalkboards so I was surprised when Brandin said we needed a BIGger one.  But I went along with it...then I saw it completed and it all made sense.  The caterers wanted all of the fresh ingredients noted, something that is a trademark of their restaurant, Salt Of The Earth.  I'm so glad we made a bigger board for this because it looked great and part of the experience of eating food from Salt. 

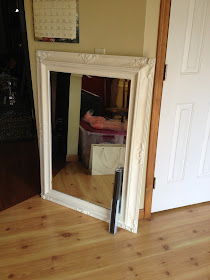
We started with this gold mirror.  U.G.L.Y.  I think it looks cheap because the color of the gold is cheap looking and there are no high or low lights.  Anyway, that is all about it change. 
 (My son supposed to be playing piano but he's hiding for some reason!)
I started by taping plastic down to cover the mirror so I wouldn't have to scrap paint off later.  
I added two coats of Annie Sloan White Chalk Paint, the clear wax and the brown wax just as I described in the tutorial here.
Here you can see I used a much lighter coat of the dark wax and it looks better.  On this board, we used the chalkboard contact paper.  A Google search gave me lots of hits for more inf.  It's widely available including Home Depot and Amazon.com.  You can see in the finished board that the contact paper looks great.  It wasn't wide enough to cover the entire mirror so there is a seam across the center, however it wasn't noticeable in the completed piece.
As for how well the contact paper worked as a chalkboard?  It looked terrific. 
Be sure to stop in again- lots more wedding tutorials to come. 

This post was linked to the following Linky Parties:
I Gotta Try That