Pages

Tuesday, April 30, 2013

Wedding: Rosettes Part 2


I do have a "Rosette Tutorial" to share but I did want to tease you with a few of the completed rosettes that will be used to decorate B's wedding.  I think they are starting to look really great.  I am not showing them all or how to do these specific ones yet.  After the wedding (mid June) I will share more details. 
 The smaller rosette were all made using Tim Holtz's Alterations Rosette and Mini Rosette Sizzlits.
 The larger ones were all made using the Ribbons and Rosettes Cartridge I discussed in the prior post.
 I LOVE the vintage look to this one even though everything is new.
 Tim's wishbones....oh baby...love them!

I'll be sprinkling glitter everywhere.
This post has been linked to the following:
I Gotta Try That
Bloom Designs
VMG206

Sunday, April 28, 2013

Wedding: Rosettes Part 1

More about Brandin's Wedding and what I am  doing...
Decor
Rosettes
You know I love Rosettes and they are very on trend right now.   Brandin wasn't so sure about them, but I knew I could make them look great and in a form she would like.  I want to have the flexibility to use them to cover a large amount of wall space or hang from the ceiling so I know I need to make a bajillion.
Cardstock
I started with collecting the scrapbook papers and cardstock.  Keep in mind, I don't have access to a local scrapbook store anywhere near me so I had to shop online.  This is always a little scary as it is hard to know exactly what the colors really are when you only have an image on a computer monitor.  I lucked out and bought a lot of Rhonna Farrer's collection with Pink Paislee called Christmas Junque.  I have all of the papers in the digital form, so I had an idea of what the colors would look like.

Scrapbook.com had a huge selection of Christmas Junque on sale for $0.10/ sheet of the 12x12 double sided cardstock.  Is it the best idea though? Hmmm lets see...
  1. Large number of sheets available…check
  2. Confident I know the true colors of the paper and they match beautifully to wedding colors….check
  3. Cheap…check
  4. Christmas Paper…what? In June?
In this case Christmas paper works because the papers either don't have an all-over "Tis The Season" design or at least one side of each paper has a fairly standard non-holiday design.  You can see that some of the papers (below) have a motif or two scattered on them that are Christmas specific.  The questions then become:

  • Can I use the other side of the paper? 
  • Can I get enough use of the paper without using the portion of the paper with the motif? 
  • Once the paper is accordion folded, is it even possible to tell if the design is more "visions of sugar plums" and less "I DO"?
  • Can I cover the holly leaf or the "pretty little girl in the red coat with the white fur trim" with add embellishments (photos coming later)?
This paper certainly is usable  and for $0.10 PER sheet it is worth working around these little "issues".
 Source: Rhonna Farrer Designs
The colors of Christmas Junque are perfect but I bought a large variety of textures, weights, colors and patterns within the color palate.  I want the rosettes to give an air of whimsy to the space.  Scrapbook.com allows you to shop by color which really helps in a situation like this- I can't imagine trying to go through all the paper that a site this large sells.

Cricut Cartidge
Cricut Ribbons & Rosettes Provo Craft
After the cardstock arrived at my house I had to get started cutting the pieces.  While it is possible to make rosettes using a scoring board, HOWEVER, making the number that I need would be way too time consuming.  It is bad enough with the Cricut cutting them all out.  I used the Ribbons & Rosettes cartridge.

If you have purchased Cricut cartridges you know the prices can vary depending on where you get it so I am listing Provo's Cricut Shop price.  The cartridge is available for $49.99 or through Craft Studio for $31.99.  
You can cut the rosettes, borders-in several sizes and designs, a single motif and it's shadow, and a frankly odd alphabet with holes in it.  Above you see a sample page from the booklet that comes with the cartridge.  Isn't that alphabet odd?
The cartridge doesn't lack for variety as you can see.
There will be a tutorial on how to make the rosettes in the near future. 
Have a great Weekend.

Wednesday, April 24, 2013

Wedding: The Colors and How to "Age" Seam Binding

I decided I won't be showing much of the finished projects until after the wedding to keep the decor a surprise for the guests.  However, that doesn't mean I can't give you some sneak peaks. Inspiration
To begin it isn't my wedding... I thought it prudent to listen to some of the bride ideas.  I jest- I'm running everything by her.  I want Brandin and Bill to have a romantic, enchanted, thrilling day filled with love.  Brandin asked for a vintage chic but laid back feel.  She is a very dynamic woman so I need to throw in some fun elements and I want to push her boundaries a little.  You know, show her things she never considered but that she finds she loves.  Isn't that when design is at its best?  I'm not ignoring the groom's role in the mood and look of the day, but honestly I hadn't met him until last week.  From that short time I spent with them, it's all good and we won't be having any problems.

No Modern 2013 wedding is complete without a Pinterest Board or two.  How in the world did I plan a handmade Michigan wedding, from Texas, almost 20 years ago and with no wedding planner.  Not only was there no Pinterest, but the Internet was yet but a fetus.  I got married during the year or so the media spoke of the "information super highway" to a nation that really had no vision of what this would mean.  I did it all armed with Martha Stewart's Weddings Book (first edition and in fact newly published) and a lot of hutzpah.... or maybe it was "ignorance is bliss"?  I can't tell you how many times I've thought how cool it would be to plan a wedding with Pinterest and Martha Stewart.com and now I get the chance.

I have a Pinterest Board labeled Brandin's Wedding with lots of pretty things we are using for inspiration.  Pop on over and check it out or any of my 58 Boards and 4000 pins.

Palate 
I showed you the color palate previously.   It is a gorgeous sherbet-y combination of peaches, aqua, mint green and cream.
I decided that rather than dying the seam binding myself- remember the red seam binding fiasco at Christmas? If you weren't around suffice to say red dye +100 yards of seam binding + a washing machine = one big mess.  Why I didn't think to put the ribbon in a lingerie bag I will never know.  I had to pick apart 100 yards of knotty, cold, red, dripping ribbon mess.  Ok, I'm back…The seam binding comes in such pretty colors that I decided to just stick with purchasing the right colors.  However, I couldn't leave it all uptight and formal.  Bring on the vintage, shabby chic look please.
All I did was pull if off the roll, give it a quick rinse in plain water just to get it wet and scrunched it up before allowing it to dry.  I put each color in an individual bowl for about 36 hours to keep it scrunched.  When it was mostly just damp I hung it on a drying rack.  Bam...mounds of vintage, romantic, gorgeous ribbon to use on all sorts of projects.

Just so you know- yesterday I had the window open and a light spring jacket.  Today it is snowing.


Sunday, April 21, 2013

Wedding Update: Location

I am helping my friend B with her June wedding.  I will admit I am not the most detail oriented person when it comes to something like a building while my hubby is Mr. Detail.  He's the kind of guy that doesn't notice when I cut 3 inches off my hair and change the color from blonde to red but will comment that the house down the street has new shingles.  True.  So, of course I decided he had to come with me to see the site that B had chosen.  I really don't want any last minute "oh no's".

The bride and groom have to clean up the barn- as payment for the use of the site- but what an amazing site it is.

 Full of antiques and amazing archicterual salvage items.
 That is me trying to figure out how to steal the windows…
The groom measuring the wall height for us.  The walls are all arc'd and really will make for a beautiful venue.  I have so much to do!

Laters Baby…


Thursday, April 18, 2013

Backgrounds: Making My Own

This week the challenge on Simon Says Stamp and Show is Backgrounds. There are lots of different techniques that can be used to background and the design team showcases several of them. You know that I am a stamper at heart so I set out to make a variety of backgrounds using some of the imagines I thought would make the most interesting backgrounds.
 The first tag was stamped with Tim's wood grain stamp- wood grain is super hot in home decor right now.  I stamped it using Embossing Distress Ink and clear embossing powered.  After I melted the embossing powder I went over the tag with several colors of brown Distress Ink.
 The flowers were left over from Tim's Tattered Florals challenge.  I hot glued them in place.  The belt was made using Grunge Paper, Distress Ink and an Idea-ology Buckle.
 My second tag was made using Tim's Damask stamp on the top 2/3 and a script stamp on the bottom 1/3.  I embossed it exactly as above and then colored it with Broken China Distress Ink.  Again more flowers from the Tattered Florals challenge were hot glued in place.
Finally the red tag was made using a harlequin stamp, Distress Embossing Ink and Black Soot Distress Embossing Powder.  
I have to be honest- I have trouble with the Distress Embossing Powder.   It is hard to know when it is heated enough and once it is heated you let it cool and then rub off the inert crystals.  This ends up giving a very distressed look.  My Black Soot rubbed off way more than I wanted but it still looks cool. I added a Grunge Paper, glittered Eiffel Tower and Idea-ology pieces.  

Finally…Great news for me.  My article Making Your Own Foam Stamps is now available in the May/June Cloth Paper Scissors issue.  It is my take on jazzing up foam stamps made using die cut foam.  

This post was linked to the following Linky Parties
Laters Baby….

Wednesday, April 17, 2013

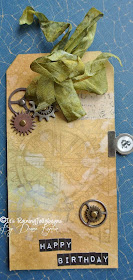
Man's Birthday Card: Steampunk

The final Birthday Card I made this week is a "man's birthday card using gears from Stamper's Anonymous Industrial Blueprint set.
 The background was also made using Distress Paints using same technique as the Princess card.  This time I stuck to lighter colors that were closer to each other so that the color is more muted and soft.  I added Distress Inks and Sprintz and Flick.  The  gears were stamped using gold pigment ink.
I added Idea-ology Tissue Tape, a File Tab, Sprocket Gears and MiniGears.  I used Label Letters to spell "Happy Birthday.  I used a scrap of seam binding that I had dyed previously and added a card made from Distress Cardstock.

This post has been linked to the following Linky Parties:
Bloom Designs
Laters Baby….

Tuesday, April 16, 2013

Grown Up Birthday Card?

My princess card wasn't appropriate for my sister-in-law so I tried again and came up with this card:
I used the same technique on the background using green, blues and bronze Distress Paints.  The stamp is also from Tim's Birthday Blueprint set.  I stamped it using Black Archival ink and heat set it.  I colored the candle, frosting and cupcake wrapper with Distress Markers and added glitter to the candle and frosting using Martha Stewart Fine Glitters
I adorned the tag with Idea-ology Tag Labels and label file.  I added blue seam binding that had been wet and dried with heat gun.  Like the princess card I added a card from folded Distress Cardstock.

This post has been linked to the following Linky Parties:
Thirty Handmade Days

Laters Baby….

Monday, April 15, 2013

Happy Birthday Cards

I have been working on my friend's wedding and I will start posting about that as soon as I process the photos.  In the mean time I have made a few birthday cards including this PrettyPretty Princess card.  It started, I kid you not, as a card for my sister-in-law.   Hmmm…while I love it, at some point I realized that she is not a preschooler but rather a full-grown adult and deserves a card that is more appropriate (come back tomorrow for that card).
 I started with Tim's gorgeous and AMAZING Distress Paints.  I puddled them on my nonstick craft sheet, spritzed with quite a bit of water and dragged the tag through it until it was covered.  Hit it with the heat gun and more water until I liked the look.  Once the paint is completely dry it is impervious to water so it was time to add the Distress Stains.  I used colors to punch up the colors on the tag then threw some water droplets on the tag and dried with heat gun.
The stamp is the hat from Tim's Stamper's Anonymous Birthday Blueprints.  Now…I have to confess…when I first saw the Blueprint line I was NOT impressed. I thought the concept was cool, but I also thought that Michelle Ward had done it better and I thought they were too "cute" for me.  Yeah, I've done a 180 on that.  I now own; Valentine Blueprints, Easter Blueprints, Industrial Blueprints.as well as Birthday.  Of course, I wasn't that excited about Distress Markers when they came out and only bought a small set because it was part of the Compendium Challange.  Well…joke's on me because I like the Distress Markers  and Blueprint stamps.  Who knew but Distress Markers and Blueprint  stamps go together like Peanut Butter and Jelly.
I colored the hat with the Distress Markers but thought it wasn't Pretty Princess enough so I added the glitter.  I think that s about the time the card when from sister-in-law appropriate to preschooler only. Most of the marker was covered by the glitter.  I always use Martha Stewart Fine Glitter.  I added redline tape to front of the tag and hand-gathered the pink crepe paper along the line.  The yellow fringe is Heidi Swapp Trimmings that I hit with a heat gun to make it curl up.  The pearls are Recollections pearl trim.  I topped it all off with blue dyed-seam binding and pearls from Tim Holtz Idea-ology Baubles.  A piece of Distress Cardstock attached to back makes it into a card perfect for any little girl.

This post has been linked to the following Linky Parties:
Thirty Hamdmade Days
Live Love Rowe

Laters Baby….